June 2010 Edition
Computer Science Department, University of Cape Town
| MSc-IT Study Material June 2010 Edition Computer Science Department, University of Cape Town |
Two things are need in order to implement client-side image maps:
An image.
A map of the image areas and associated hyperlinks.
Most images created for Web pages are in either in JPEG or PNG format. The first step to developing an image map is to ensure that you have a version of your image in a format supported by imagemaps for the browsers you are using. The old GIF image format is widely supported by image maps, but all modern browsers also support newer formats, such as PNG.
If the image is not already in the format you wish to use (such as PNG), you will need to convert it. The GIMP is a Free Software image editor, similar to Adobe's Photoshop, that will allow you to not only convert images to the format you require, but to also edit the images. The software is free for both commercial and non-commercial use.
You may find it useful to perform the following activities in preparation for the next sections:
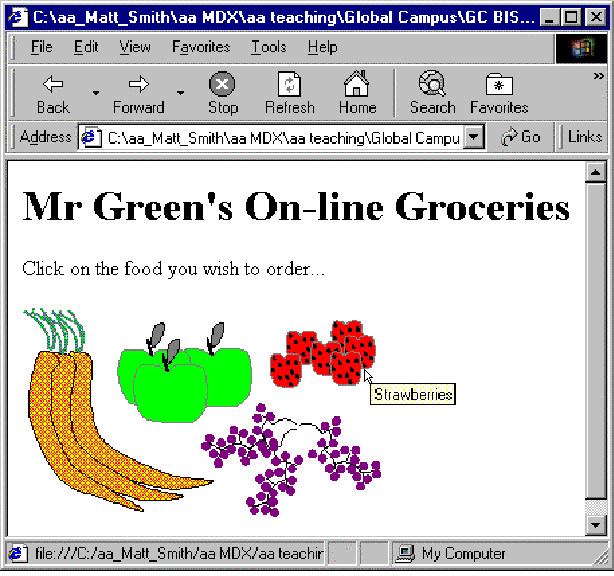
Mr. Green's Grocery Company wishes to start trading on-line.
Locate or create a picture of three or four different vegetables in a single PNG image (e.g. an area of carrots, apples and bananas). This PNG file will be needed for some of the later activities.
Store this image in a directory called "on_line_grocer".
You can find a discussion of this activity at the end of the unit.
Create an HTML file called food.html that displays your vegetables image. Use the heading "Mr Green's On-line Groceries", and display the text "Click on the food you wish to order."
You can find a discussion of this activity at the end of the unit.
Create an HTML file called "out_of_stock.html".
Make this a simple page that has the same "Mr Green's On-Line Grocery" heading as previously, and then the message: "Sorry we are presently out of stock of your selected food." (this page is required as part of a later activity)
You can find a discussion of this activity at the end of the unit.
The HTML IMG tag is used to display the image:
<IMG src="foods.gif" >
To associate an image with a particular imagemap, more attributes are provided to the IMG tag. This code associates the foods.gif image with an imagemap named fruit_and_veg:
<IMG src="foods.gif" usemap="#fruit_and_veg">
The border is often set to zero (i.e. so there is no outline), and an alternative text message for the image is defined as well:
<IMG src="foods.gif" alt="foods for purchase" usemap="#fruit_and_veg" border="0">
Note that the hash '#'symbol precedes the image map filename in the IMG tag.
An imagemap needs to be associated with the image. A <map> is an HTML tag defining the active image areas and corresponding hypertext links (and other attributes of the areas).
The generic form of a map is as follows:
      <map name="MAPNAME" >
      <area shape="SHAPE" cords="X1, Y1, ..." href="HYPERLINK" ...>
      <area ... >
      <area ... >
      </map >
where:
"MAPNAME" is the map's chosen name (to be specified in the IMG tag that displays your image).
"SHAPE" is one of "rect", "circle" and "poly" — specifying the shape being defined.
"X1, Y1, ..." is the set of coordinates defining an image area.
"HYPERLINK" is a standard hyperlink, and is the hyperlink that is followed when the user clicks inside the defined image area.
An example of a map is:
      <map name="geometry" >
      <area shape="rect" cords="10,10,50,50" href="square.html" >
      <area shape="circle" cords="100,100,40" href="circle.html" >
      <area shape="poly" cords="100,200,200,200,200,300,100,200" href="triangle.html" >
      </map >
As you can see from the previous section, a map consists of a set of areas. Each area can have following attributes defined:
the shape of the area being defined.
the coordinates (cord) that define the boundaries of the area.
the hyperlink (href) to be followed when the user clicks inside the area.
title text (title) to be displayed next to the mouse pointer when over the area.
The Javascript actions to execute when the mouse pointer moves over the area (onMouseOver) or moves away from the area (onMouseOut)
We shall consider each of these in turn.
Consider the example map again:
<map name="geometry" >

<area shape="rect" cords="10,10,50,50"
href="square.html" >

<area shape="circle" cords="100,100,40"
href="circle.html" >

<area shape="poly"
cords="100,200,200,200,200,300,100,200"
href="triangle.html" >

</map >
This example illustrates the three different shapes possible with the area tag:
rectangles rect
circles circle
polygons poly
Some browsers accept other versions of these shape names, such as circ, rectangle, polygon.
Any other kind of shape can be approximated by creating a polygon with many edges.
The shape is defined by providing the shape name in quotation marks. For example, to define a circular area one would write the following:
<area shape="circle" ... >
Each shape type requires a different set of coordinates to define the area boundaries.
The coordinates are provided in quotation marks, and separated by commas. For example the values to define a rectangle might be:
cords="10,10,50,50"
Notice in the example how the number of coordinates is different for each shape:
4 coordinates for the "rect"
3 coordinates for the "circle"
8 coordinates for the "poly"
Why is this? What do you think the three coordinates for the circle define?
You can find the answers to this exercise at the end of the unit.
The hyperlink to be followed when the user clicks within an area is defined just as any other hyperlink. For example a link to a page "products.html" would be defined as follows:
href="products.html"
Text can be provided that is displayed when the mouse is over the area. This can give the user an idea of the area's boundaries, and also what might occur if the area is clicked.
This text is defined with the "title" attribute. For example to define title text of "Strawberries" one would write:
title=" Strawberries"
The figure below illustrates title text being displayed by the user's mouse pointer when over an area: