
June 2010 Edition
Computer Science Department, University of Cape Town
| MSc-IT Study Material June 2010 Edition Computer Science Department, University of Cape Town |
Inside your food.html file create an image map called "fruit_and_veg".
In your "fruit_and_veg" image map, create a rectangular area around one of your groups of vegetables (for example in the "foods.gif" image the red strawberries seem to lend themselves to a rectangular area.
You can either estimate the coordinates if you know the image size, or use freely available software such as the GIMP (previously mentioned).
Make your defined area hyperlink to your HTML page "out_of_stock.html".
Remember to extend your IMG tag to state that the "fruit_and_veg" map should be used.
You can find a discussion of this activity at the end of the unit.
Edit your map so that title text is displayed when the mouse pointer is over your area. So, for example, for our foods.gif image and the rectangle around the strawberries the title text chosen is "Strawberries".
You can find a discussion of this activity at the end of the unit.
Create an image map for the following image (shapes.gif):
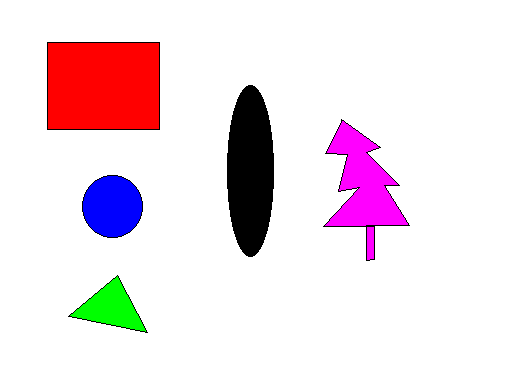
Set appropriate title text for each area you define: so the title text for the red rectangle should be 'Red Rectangle', and for the blue circle should be 'Blue Circle' and so on.
If you do not have the use of an image map tool, the top left of the image is, as always, (0, 0); the bottom right will be the height and width of the image.
You can find a discussion of this activity at the end of the unit.
Consider the three pages below. The pages have been created using with the three GIF images: home.gif, products.gif and contact.gif.
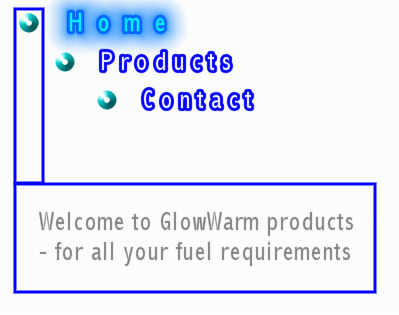
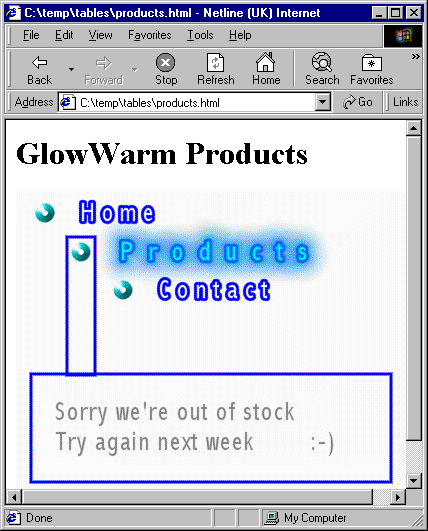
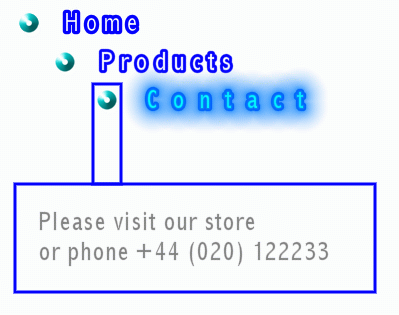
Create three HTML files (index.html, products.html and contact.html) that look as above. Note that the home.gif image should be displayed in the index.html file, since index.html is a convention to follow for the home page of a site.
Create an image map for each image, so that as the mouse pointer passes over the word "Products", the "products.html" file is displayed etc. Thus the user should be able to navigate without having to click the mouse at all.
You can find a discussion of this activity at the end of the unit.
Consider the three pages below. The pages have been created using with the three GIF images: about_nav.gif, products_nav.gif and contact_nav.gif.
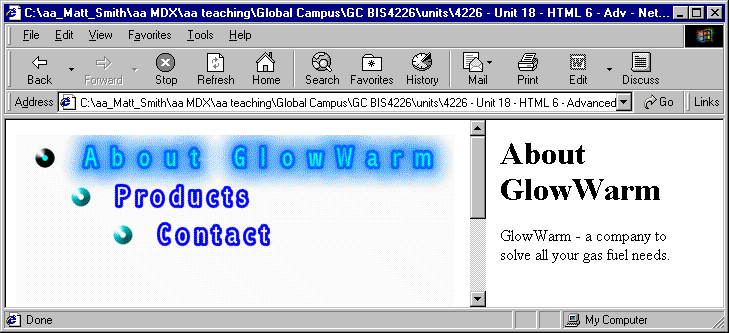
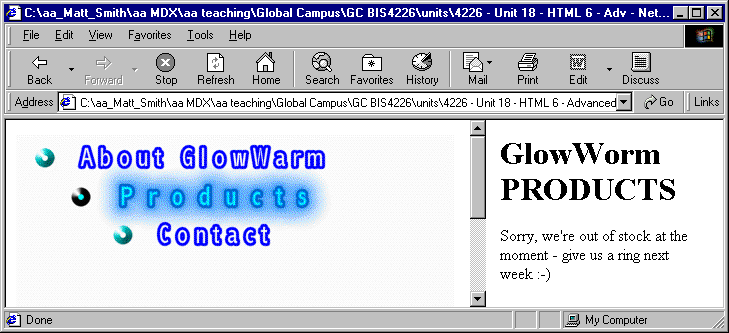
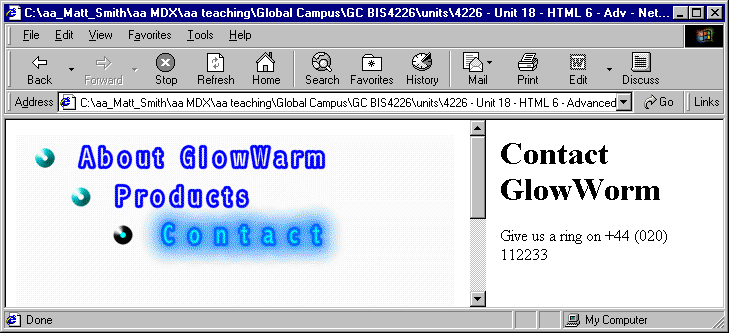
These pages illustrate how the contents of the right hand frame can be controlled from a simple Javascript command coded in an image map onMouseOver attribute.
The .html pages displayed in the right hand frames are: about.html, products.html and contact.html.
Create three HTML files to display the GIFs and define the image maps. The image maps use the onMouseOver attributes to load the appropriate files into the right and left frames.
You will also need an initial file (index.html) to set up the frames and load the initial files into each frame.
Call your HTML files:
index.html (to display the about_nav.html and about.html files)
about_nav.html
products_nav.html
contact_nav.html
You can find a discussion of this activity at the end of the unit.
What are the different image map shapes that can be defined?
Which are more 'portable': server-side or client-side image maps?
Discuss this statement: You should keep things consistent and simple by always defining all areas as polygons.
Discuss this statement: You should always define contiguous (physically touching) areas for all parts of an image, so wherever the user clicks, the nearest relevant hyperlink is followed.
You can find the discussions on these review questions at the end of the unit.