Tables are useful for laying out text and images on in Web page. Before continuing with instructions on how to do this, let us first consider why there is a need to manage layout.
If you are reading this paragraph on a 17 inch to 21 inch monitor, you will be having difficulties, because
the lines of the text are too long for the monitor. Tables can be used to restrict the output so that the
display remains constant, or fixed; thus independent of not only the browser, but also the monitor size.
It is important to realise that it is not a monitor's absolute size that is usually of interest, but rather its screen resolution. While a Web browser can manage to layout a document at any resolution, different resolutions do effect the layout and presentation of an HTML document. Resolution is measured in picture elements, called pixels. Typical monitor resolutions are 640x480, 800x600, 1024x870, 1280x1024 and 1600x1200.
Resolution and monitor size are independent of one another: a large monitor can have a low resolution, while a small monitor may have a high resolution. Resolution is determined by the hardware, the user, and the video card driver installed on the computer. A single monitor may have a choice of resolutions.
There is also the issue of a browser's 'live space'. Live space refers to the browser area the Web page is displayed in. This can vary from user to user, as the toolbars and status bars the user chooses to have displayed in the browser will reduce or increase the live space available to a Web page.
It is for all these reasons that the dichotomy between fixed and flexible Web page design has occurred.
By default, all Web pages are designed with flexibility in mind. Flexibility can be defined as a Web page's ability to resize and adapt to the available resolution, monitor and window sizes. Such an approach has both advantages and disadvantages.
Advantages:
Default Setting: therefore no new tags are needed — the Web page fills entire space.
Philosophical: flexibility is the philosophy of the Web i.e. it should be accessible by the greatest number of users.
Realistic: resolutions, monitor and window sizes are always different. Keeping a Web page flexible allows it to be viewed on many available formats.
Disadvantages:
Uncomfortable: reading text on large monitors is uncomfortable as the lines are too long.
Unpredictability: the designer often cannot predict how a Web page will appear under varying resolutions and live space sizes.
Coherence: on small monitors, everything may not appear correctly.
While HTML is flexible by default, it should not be confused with thinking a flexible document is disorganised, poorly managed with an unstructured layout. A flexible HTML document can still be structured and organised by using, for instance, tables to create columns of text (as in newspapers), and provide layout design.
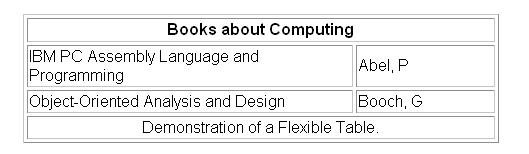
Flexible layout can be achieved by using percentage measurements for table dimensions. As an example, view the table below by changing the size of your browser's window (i.e. the live space). Observe that as the window size changes, so does the table size.
The table measurements used in this example are called 'relative' measurements, as the sizes are expressed in terms of a percentage of the screen space.
Fixed design expresses all dimensions in pixels: the dimensions remain fixed regardless of the size of the device it is viewed on. Such an approach has advantages and disadvantages:
Advantages:
Consistency: it is usually important for companies to maintain a consistent image.
Control: fixed design imposes restrictions on line length and hence stops uncomfortably long lines from occurring on Web pages.
Disadvantages:
Incompatible: the chosen fixed size may be too large for a user's available live space, causing the user to scroll in order to view the whole page; a fixed Web page may also appear too small, leaving unsightly blank spaces.
Totalitarian: the Web does not want to run the risk of being under too much control, i.e. we do not want every Web page to be identical. Some issues in print design are not transferable to the Web, which has its own idiosyncrasies, giving it the advantage of being independent of the print media.
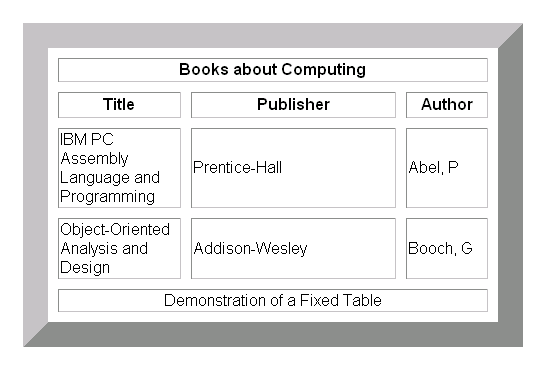
To develop a fixed Web page using tables, supply all measurements in pixels. The table below is a demonstration of a fixed table — change the size of your browser window and see the effect it has.
To Do
Read up about standard table templates in your textbooks.
Activity 3: Using rowspan
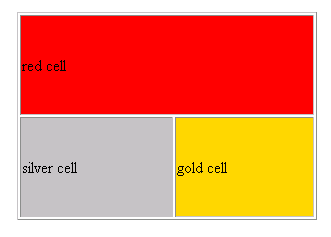
This Activity introduces you to the attribute rowspan. The objective of this Activity is to create the following table.
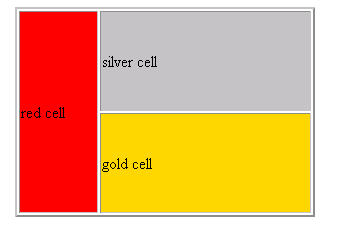
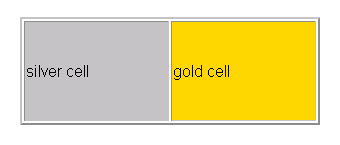
Let us start by creating the necessary code for displaying the silver and gold cells.
  <center>
  <table width=300 border =2>
  <tr>
  <td bgcolor="silver" height = 100> silver cell</td>
  </tr>
  <tr>
  <td bgcolor="gold" height = 100> gold cell</td>
  </tr></table></center>
Save this file as adv_tab1.html and view it in your browser. It should appear as so:
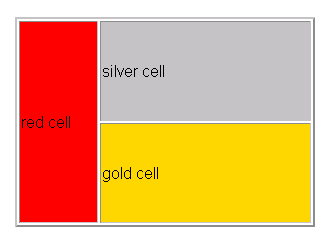
Now we insert a red cell spanning two rows. This is done with the rowspan attribute. The following syntax is used when designing tables that include rowspan.
<td rowspan=x> where x is the number of rows to be spanned.
Reopen adv_tab1.html and make the amendment shown in bold, below.
  <center>
  <table width=300 border =2>

      <tr>
      <td bgcolor="red" rowspan=2 width=75> red cell</td>
      <td bgcolor="silver" height=100> silver cell</td>
      </tr>
      <tr>
      <td bgcolor="gold" height=100> gold cell</td>
      </tr>

  </table>
  </center>
Save this exercise as adv_tab2.html and view it in your browser. It should now look as below:
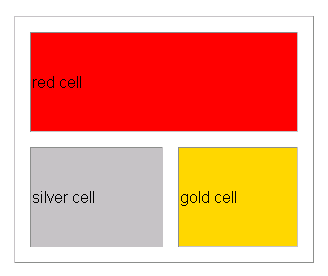
Activity 4: Using colspan, cellspacing and cellpadding
This Activity introduces you to the attributes colspan, cellspacing and cellpadding. The objective of this Activity is to create the following table.
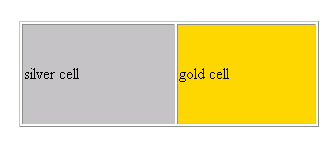
Let us begin by creating the silver and gold cells.
  <table width=300 border = 1>
  <tr>
  <td height = 100 bgcolor="silver">silver cell</td>
  <td bgcolor="gold" height = 100>gold cell</td>
  </tr>
  </table>
Save this file as adv_tab3.html and view it in your browser. It should appear as below:
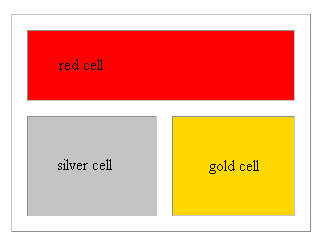
For the next step we insert a cell that spans the two columns, using the colspan attribute:
<td colspan=x> where x is the number of columns to be spanned.
Reopen adv_tab3.html and make the amendment as shown in bold, below:
  <table width=300 border=1>
  <tr>
  <td  colspan=2 height=100 bgcolor="red">red cell</td>
  </tr>
  <tr>
  <td height=100 bgcolor="silver">silver cell</td>
  <td bgcolor="gold" height = 100>gold cell</td>
  <tr>
  </table>
Save this exercise as adv_tab4.html and view it in your browser. It should appear as below.
The space between the cells is known as the cellspacing. This is controlled with the table attribute cellspacing. The following syntax is used with cellspacing:
<table cellspacing=x> where x is the amount of cellspacing required.
Reopen adv_tab4.html and make the following alterations to the code, as shown in bold.
  <table width=300 border=1 cellspacing=15>
  <tr>
  <td colspan=2 height=100 bgcolor="red">red cell</td>
  </tr>
  <tr>
  <td height=100 bgcolor="silver">silver cell</td>
  <td bgcolor="gold" height = 100>gold cell</td>
  <tr>
  </table>
Save this exercise as adv_tab5.html and view it in your browser. It should appear as below:
The space between the text 'red cell' and the cell's border is known as the cellpadding. This can be altered with the attribute cellpadding:
<table cellpadding = x> where x is the thickness, measured in pixels, of the desired cellpadding.
Reopen adv_tab5.html and make the following amendments to the code, shown in bold.
  <table width=300 border=1 cellspacing=15 cellpadding=25>
  <tr>
  <td colspan=2 height=100 bgcolor="red">red cell</td>
  </tr>
  <tr>
  <td height = 100 bgcolor="silver">silver cell</td>
  <td bgcolor="gold" height = 100>gold cell</td>
  <tr>
  </table>
Save this exercise as adv_tab6.html and view it in your browser. It should appear as required.
Activity 5: More cellspacing and cellpadding
The objective of this Activity is to create the table shown below.
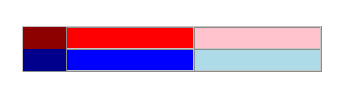
This Activity also introduces some of the anomalies that Web page developers deal with during Web page design. In particular, we focus on anomalies with the cellspacing attribute.
Three points should be noted for the above table:
There are no visible borders, therefore border=0 is needed.
There is no cellspacing between cells, so cellspacing=0.
There is no cellpadding, therefore cellpadding=0.
Now follow these steps to complete the activity.
Begin a new file in a text editor and enter the following HTML code:
  <table border=1 cellspacing=0 cellpadding=0 width=300 height=30>
  <tr>
  <td height=15 bgcolor="darkred"></td>
  <td bgcolor="red"></td>
  <td bgcolor="pink"></td>
  </tr>
  <tr>
  <td height=15 bgcolor="darkblue"></td>
  <td bgcolor="blue"></td>
  <td bgcolor="lightblue"></td>
  </tr>
  </table>
Save your file as adv_tab7.html and view it in your browser. It should appear as required.
To Do
Read up about cell spacing in your textbooks. Try to discover common problems and mistakes that Web designers encounter when using tables. While doing this, continue to build on your list of table related tags.
Activity 6: Fixed and flexible Web page design
The objective of this Activity is to compare fixed and flexible Web page design.
Design a table with two columns, each containing text.
First create the table using a flexible page layout. Ensure that your table works as expected by resizing the browser window.
Now create the table using a fixed Web page design. Again, check that your answer is correct by resizing the browser window.
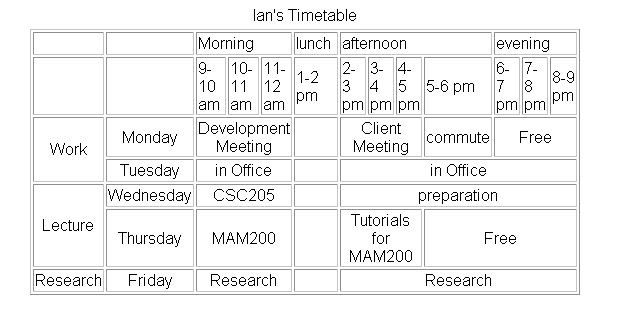
Activity 7: Time Table
Write the necessary HTML code for your own study timetable. This should look similar to the one shown below. (Hint: use the colspan and rowspan attributes).