Work through Activity 1 in order to understand how tables are created. Bear in mind that rarely is anything achieved which satisfies all of the stated requirements in the first pass. The key to developing perfect Web pages relies on that old adage: "Learn from your mistakes!"
Therefore, as long as a start is made, and mistakes are seen as a learning experience, then the design process will eventually succeed.
Please feel free to experiment at any time. If you make mistakes but manage to correct them, take encouragement from this.
Activity 1: Creating a Table
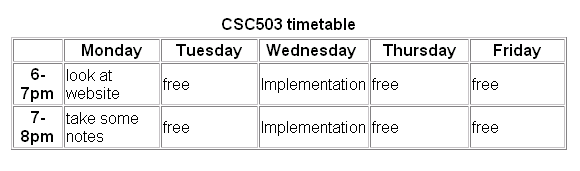
The objective of this Activity is to create a timetable for CSC5003 students to be displayed on a Web page as shown below:
Begin a new Web page in your text editor. The header is shown below. When entering the text, try to spot the deliberate mistake and correct it as necessary.
  <HTML>
  <HEAD>
  <TITLE>
    HTML Table Design
  </HEAD>
  </TITLE>
  <BODY>
  </BODY >
  </HTML >
The correct code is given at the chapter's end.
Save your file as tab_ex1.html
The next stage is to open the table. To open and close a table, use respectively the <TABLE> and </TABLE> tags within the document's BODY.
  <HTML>
  <HEAD>
  <TITLE>
    HTML Table Design
  </HEAD>
  </TITLE>
  <BODY>
      <TABLE>
      </TABLE>
  </BODY >
  </HTML >
Save the file and load it in your browser. At first you will notice a blank screen as the table is not visible. A border and rows may be added to make the table visible.
When adding a border, its size can be defined in pixels, for example: <TABLE border=10 width=80%>. Notice the use of the width attribute to set the table to a width of 80% of the screen's size (this can also be defined in pixels).
The <TR>tag is used to add rows. Each row is composed of several data cells. Their dimensions can be defined using width and height attributes: <TD width=25% height=20 bgcolor="darkred"> Notice that the cell's colour can also be defined.
Try to create the table below:

Reopen the file tab_ex1.html in your text editor and make the following amendments. Note the <CENTER> tag centres the table horizontally.
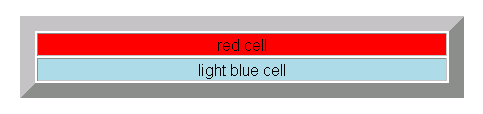
  <BODY>
      <CENTER>

          <TABLE border=25 width=80%>
          <TD bgcolor="red" width=25% red cell</TD>
          <TR>

              <TD bgcolor="lightblue" width=25% height=70>light blue cell</TD>

          </TR>
          </TABLE>

      </CENTER>

  </BODY>
Save this file as tab_ex2.html and view it in your browser. It appear as below.
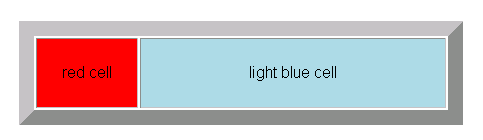
Let us examine the HTML code. The first problem is that it attempts to insert a cell before inserting a row. This can be corrected by swapping the respective TR and TD tags. With this correction, as well as a few other modifications, you should have the following HTML listing.
  <table border=15 width=80%>
    <tr>
      <center>
        <td width=25% height=70 bgcolor="red">red cell</td>
        <td width=75% bgcolor="lightblue">light blue cell</td>
      </center>
    </tr>
  </table>
Save this file as tab_ex3.html and view it in your browser. It should look as below.
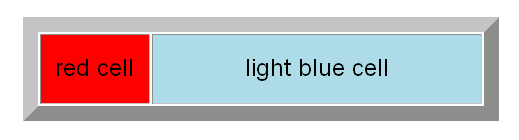
We can see that the text is still not aligned correctly, either vertically or horizontally, and the font size is incorrect. Try to correct this by making the following amendments. Save the file as tab_ex4.html.
  <CENTER>
  <TABLE border = 25 width = 80%>
  <TR>
  <CENTER>
  <FONT size=5>
  <TD bgcolor="red" width=25% height=70> red cell </TD>
  <TD bgcolor="lightblue" width=75%>light blue cell </TD>
  </FONT>
  <CENTER>
  </TR>
       </TABLE>
  </CENTER>
When viewed in your browser, the page will probably appear as below:
This demonstrates an important point: in order to change the text attributes, each cell has to be addressed individually. This requires setting the text in the red cell to <FONT size=5> and repeating this for the light blue cell. Notice that the text has been (by default) vertically aligned in the centre. This can be remedied by using the following code below:
  <CENTER>
  <TABLE border = 25 width = 80%>
  <TR>
  <TD bgcolor="red" width=25% height=70 valign=top>
  <center><FONT size=5>red cell</FONT> </center>
  </TD>
  <TD bgcolor="lightblue" width=75% valign=bottom>
  <center> <FONT size=5>light blue cell</FONT></center>
  </TD>
  </FONT>
  <CENTER>
  </TR>
  </TABLE>
  </CENTER>
In order to meet the objective of this Activity — that is, to create a timetable for CSC5003 — use the HTML code below. However, be aware that it contains several mistakes which you should correct. Save this as tab_ex5.html.
One extra HTML tag needs to be introduced: the TH tag, which inserts a table header cell. It is similar to the TD tag and has the same attributes (i.e. align, bgcolor, height etc.). However, TH is used to set the cell's text apart from the rest of the table's text, usually setting it bold and slightly larger.
Replace the relevant TD tags with TH tags. Note: one TH tag has already been inserted as a guide.
  <center>
    <table border =1 width = 800>
      <caption>CSC503 timetable</caption>

      <tr>
        <td width=50> </td>
          <th width=150>Monday<th>
        <td width=150>Tuesday</td>
        <td width=150>Wednesday</td>
        <td width=150>Thursday</td>
        <td width=150>Friday</td>
      </tr>

         <td>6-7pm</td>
        <td>look at website</td>
        <td>free</td>
        <td>implementation</td>
        <td>free</td>
        <td>free</td>

      </tr>
      <tr>

        <td>7-8pm</td>
        <td>take some notes</td>
        <td>free</td>
        <td>implementation</td>
        <td>free</td>
        <td>free</td>

      </tr>
    </table>
  </center>
Now that you have completed Activity 1, you should have a good idea of how to create a basic data table.
Here are instructions on how to organise and display data in a table:
Insert the <TABLE> tag and decide on the table's dimensions (if required)
Add a row using the <TR> tag
In the newly created row, insert a cell <TD> with the necessary dimensions and other attributes
Add the data to be displayed
Terminate the data cell </TD>
Repeat steps 3-5 as necessary
Terminate the row </TR>
Repeat steps 2-7 until all the necessary rows have been added
Terminate the table </TABLE>
To Do
Look up the basic table structure in your textbooks and on the Internet. Draw up a list of the tags for your own use and reference.
Check your list against this one:
| HTML tag | Comments |
| <TABLE> </TABLE> | Table definition and end tag |
| <CAPTION> </CAPTION> | Caption definition and end tag |
| <TR> </TR> | Row definition and end tag |
| <TD> </TD> | Cell definition and end tag |
Activity 2: HTML Colours Table
This Activity's objective is to write the HTML code to display the following table. Feel free to add more colours.
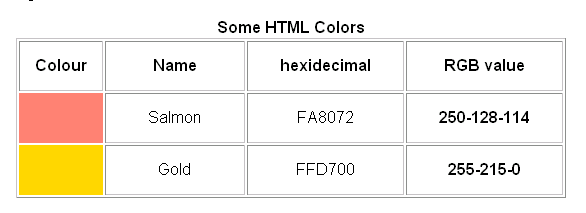
See the end of the chapter for the solution.
To Do
Read up on 'Spanning Rows and Columns' and 'Table Appearance and Colours' in your textbooks. Add the new tags to your list of table related tags.