
June 2010 Edition
Computer Science Department, University of Cape Town
| MSc-IT Study Material June 2010 Edition Computer Science Department, University of Cape Town |
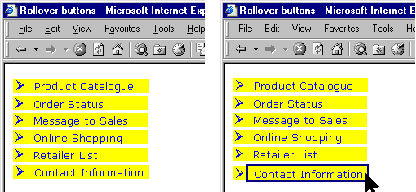
A common use for event handlers is to produce small animations to reinforce some aspect of the user interface. There are many situations where this may help the user to focus on some part of a Web page. For example, the buttons used in the screen shot on the left below can be enhanced by highlighting the button, as in the screen shot on the right below. This style of animation is known as a 'Rollover'.
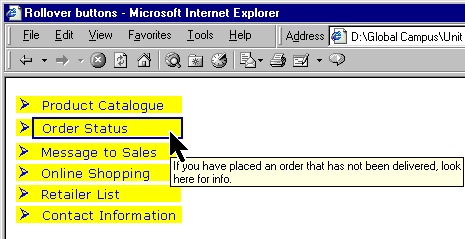
Indeed, most rollover arrangements will also include the text value of the images' ALT attributes, as in the diagram below:
How can you script such an interaction? The basic strategy is to
swap an image that represents an unselected button, for example,
 with an image that represents the selected button —
 — and then swap it back.
Can you think of the event or events that would trigger these swaps? And can you guess how you would refer to the image object from within the event handlers?
You can find a discussion of this exercise at the end of the unit.
The HTML/JavaScript code for the button rollover is as follows:
    <IMG VSPACE=2 SRC="prod-cat-button.gif" onMouseOver="this.src='prod-cat-button-sel.gif'"
      onMouseOut="this.src='prod-cat-button.gif'" ALT="Check out the full Catalogue with details of
      special orders.">
The IMG tag is just as you have previously seen. Ignoring the event handlers, it guarantees vertical spacing of two (via VSPACE attribute) and specifies the source of the image to be prod-cat-button.gif (via the SRC attribute); at the end of the tag it specifies the alternative (ALT) to the graphic image that also provides help to the user when the mouse pointer is over the button image.
As you might guess from the earlier use of the this variable with button objects,
this is used in the event
handlers to refer to the object corresponding to the graphical
image being used as a button. As IMG tags have a SRC attribute,
so to image objects have a src property accessible in
JavaScript. Hence, within each of the event handlers the
src property is changed to
modify what image is being shown. In the mouse-over event
handler, the image source is changed to refer to the graphic
image that represents the selected version of the button. So,
for example, if the image source specifies the file containing
 ,
moving over the image will change its source to specify the file
containing —
,
moving over the image will change its source to specify the file
containing —
 .
Then, when the mouse pointer leaves the image, the original
graphic (e.g.
.
Then, when the mouse pointer leaves the image, the original
graphic (e.g.
 ) is restored.
Complete the HTML/JavaScript for the button rollover interaction shown in the previous diagram using the 'this' style of referencing the image and placing break (<BR>) tags after each image (<IMG>) tag.
You can find a discussion of this exercise at the end of the unit.
Choose a gif, jpg or png image of your choice. Write an HTML page that displays the image and produces a warning dialogue box when the mouse pointer is over the image.
You can find a discussion of this activity at the end of the unit.
Produce an HTML page that displays the image you used in Activity 3, but in this page make the status bar gives different messages according to whether or not the mouse pointer is over the image. You will need to use the event handler onMouseOut.
You can find a discussion of this activity at the end of the unit.
Every IMG HTML tag has an equivalent JavaScript image object. To make these objects easily accessible it is possible to provide a NAME attribute to the IMG tag. For example, to give an image the name "change", we would use the following IMG attribute: NAME="change".
Now, in any JavaScript used in the HTML page, the image object will be stored in a variable called change. So, to access the image's src property, you could use the following code:
change.src
Now, try to set up an image and change it to another image when the mouse goes over it. If you have problems, look at the source code for the example above.
You can find a discussion of this activity at the end of the unit.