
June 2010 Edition
Computer Science Department, University of Cape Town
| MSc-IT Study Material June 2010 Edition Computer Science Department, University of Cape Town |
Table of Contents
As mentioned in Unit 10, the interesting behaviour of a system tends to be dependent on changes to the state of the system as a whole, or to its components. The kind of interaction a Web application might include usually involves short-term changes of state in which it is only important to know that they have occurred. That is the change of state is not intended to persist; it happens and it is not stored explicitly in the system. Such a change is indicated by an event. In the context of JavaScript, an event is an action that occurs in a browser that JavaScript provides facilities to detect and so act upon. Events are generally related to user interactions with the document, such as clicking and pointing the mouse, although some are related to changes occurring in the document itself. Programming JavaScript to handle such events provides for many styles of human-computer interaction. In short, programming JavaScript event handlers is crucial if you want interactive Web pages. When this style of programming dominates your design, it is known as event-based programming.
One event that you already know about occurs when the mouse is clicked on something, such as a hypertext link. Of course, the browser itself may intercept these events. You will note that many browsers change the status bar when the mouse is moved over an anchor. It is usually changed to the anchor's URL. In this case the browser has intercepted the event and has caused some action to occur. Events are useful for seeing what the user is doing and to provide them with extra information concerning their action.
Events are frequently used on forms to make it easier for the user to type in correct information, and to warn them when they input something incorrectly. For instance, if a text box requires a phone number, you can use events to notice whenever the user inputs data into the text box, and to ensure that the inputted data contains only numbers and dashes. Finally, you can validate all of the input before the user submits the form.
Events don't only have to be used to process forms. They could, for instance, by used when you have a number of frames which need to have their content changed when a user clicks on an anchor.
It is possible to add JavaScript to individual HTML tags themselves without using SCRIPT tags. These are often only single lines of code, and are thus nicknamed 'one liners'. This is not the only way to program event handlers, but is often the most convenient. This style of handling events is evidence of the close relationship between HTML and JavaScript: for a whole range of HTML elements tag attributes are provided that are associated with events. These attributes have as their value JavaScript code that is executed if the event occurs. For example, anchor tags support the event of a mouse pointer being moved over the anchor using the attribute onMouseOver. If a tag supports the event represented by the attribute, and the event occurs, then the JavaScript that is the value of the attribute is executed.
Many events can occur while a user is interacting with a Web page. For example a user might click on a button, change some text, move the mouse pointer over a hyperlink or away from one, and, of course, cause a document to load. There are event handlers for these events with names that include: onClick, onMouseOver, onMouseOut, onLoad. (We will be making use of all of these later.)
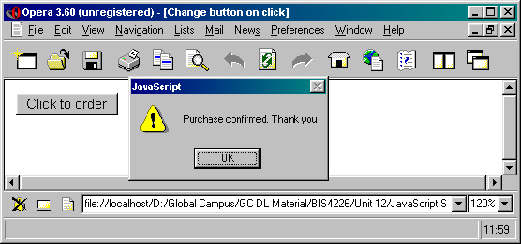
One of the simplest events is a mouse click. It is represented by the attribute onClick and supported by links and HTML button elements. Examine the following tag with an event handler as an attribute — a so-called 'one-liner'. (We will assume that this tag appears between <FORM> and </FORM> tags.)
<INPUT type="button" value="Click to order" onClick="window.alert('Purchase confirmed. Thank you')">
When a browser interprets this tag, it renders a button labelled Click to order. Subsequently, if a user clicks on that button, the click event is detected and the JavaScript associated with its attribute is executed. Here, an alert dialogue box is displayed, as shown below.
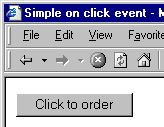
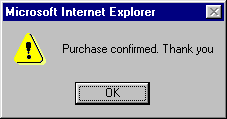
Let us work through this HTML and JavaScript. The first part of the <INPUT> tag is as you have previously seen: the type attribute is assigned the value button; the value attribute, which labels the button, is assigned the value Click to order. Then comes the new attribute for the tag <INPUT>. It is onClick, and is given the value that in this case is a single JavaScript statement that invokes the window.alert() method. This final attribute assignment creates an event handler for the particular JavaScript object representing the button such that clicking on the visual representation of the button causes the code to be executed.
In general, a sequence of statements may be included in the event handler. However, as it is essentially a 'one-liner'. Each line in the sequence must be separated by semicolons (as would be done in Java).
For example, including a second dialogue box that said 'Have a nice day' would require a semicolon, as in:
    <INPUT type=button value="Click to order" onClick="window.alert('Purchase confirmed. Thank you');
    window.alert('Have a nice day')">
This HTML/JavaScript works just as previously, except that clicking on the 'Click to order' button will produce a second alert box after the first has been dismissed.
Modify the earlier onClick example to include a flashing background colour before the alert dialogue box. Make sure you restore the initial background colour by saving it first with a variable and using the variable to restore the colour at the end. Depending on the speed of your computer, you will probably need at least two colour changes to notice anything.
You can find a discussion of this exercise at the end of the unit.
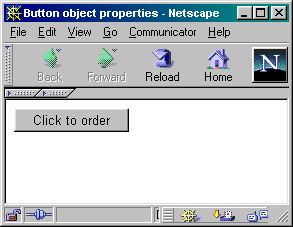
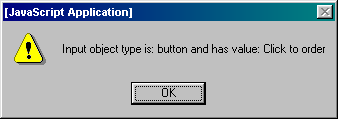
Earlier, it was suggested that you could conceive of the button as being an object with a nameless method that is invoked when you click on the button visible via a browser. You can, in fact, see that the HTML tag is implicitly creating a button object by accessing the button object and its properties — its type, as defined in the HTML tag, and its value, the text shown as the button label and defined by the VALUE tag. To do so the special variable this is used to refer to the object which the method belongs to. Hence, this.type can be used to access the type property, and this.value can be used to access the value property. The following variation of the first event handler can be used to confirm the object nature of the HTML button element:
    <INPUT type=button name="orderButton" value="Click to order" onClick="window.alert('Input object type is: '+
    this.type + ' and has value: ' + this.value)">
Executing this HTML <INPUT> tag (in a form) will produce the button as before, but when you click on it, the alert dialogue box now shows the two properties of the object referred to by this, as below:
Note that you can apparently change some properties of such an object. It is not clear that you would ever need to change the type of a button (e.g. from this sort of action button to a radio button) but you might want to change the label.
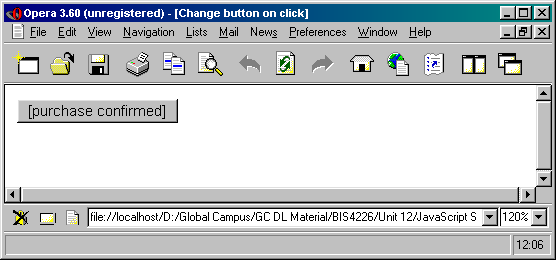
Examine the original onClick example, which confirms a purchase, and the previous variation in which the button properties are accessed via the this keyword. Then devise HTML/JavaScript that confirms a purchase, as in the original example of onClick, but which changes the label of the button after the confirmation to [Purchase confirmed]. See the diagrams below for the sort of thing you are aiming for.
Hint: use the this keyword like a variable to assign a new string to the value property so that the new string is the text on the button.
You can find a discussion of this exercise at the end of the unit.
As mentioned earlier, the anchor tag <A> can be enhanced to include JavaScript event handlers that correspond to the mouse pointer moving over the enclosed link, moving away from it and clicking on it. These anchor tag attributes are, respectively, onMouseOver, onMouseOut and onClick.
The general form is similar to that for <INPUT> with the event attribute following the link. Say you wanted to warn a user who had clicked on a link that the URL was not necessarily what they had wanted. For example, there is a UK company whose website URL is www.apple.co.uk. The company is not the UK division of Apple Computer Inc., so it might help a user to warn them what the link they had clicked on was maybe not what they wanted. (After the warning the user could stop the browser connecting to the server and go back.) The HTML/JavaScript is as follows:
    <A href="http://www.apple.co.uk" onClick="alert('Remember this is not
    the Apple Computer Site')">Apple.co.uk</A>
Of course warning a user after he or she has done something (clicked on the link) is not as helpful before one given before the action. The mouse-over event, which is programmed using the onMouseOver attribute allows this. For example:
    <A href="http://www.apple.co.uk" onMouseOver="alert('Remember this
    is not the Apple Computer Site')">Apple.co.uk</A>
This tag differs from the previous one only by the replacement of onClick by onMouseOver. When the user moves the mouse pointer over the link, the dialogue box appears with its warning. Thus, the user can avoid the URL.
However, even this style is not optimal for the user. The warning can interfere with the interaction, requiring to be dismissed by clicking on OK or pressing the Enter key. A common practice is to use the window's status area, just as we did in the previous unit. We can avoid a browser's default behaviour of displaying a URL in the status area of the window's bottom bar, by inserting something more helpful to the purposes of the document — such as the kind of warning just discussed.
Let us take a different example, in which a document is meant to sell something to its user. You might to encourage the user to follow a link to some on-line shopping as soon as he or she moves over the link to the on-line shop, as in the following. First the document provides some ordinary text, followed by a link that reads ''. Placing the mouse pointer over the link generates the text in the status area.
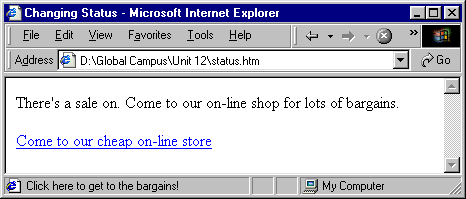
Note that the text 'Click here to get to the bargains!' only appears in the status area when the mouse pointer is over the link. This is achieved using the mouse-over event. As the name suggests, when the mouse pointer is over the link, the appropriate JavaScript code is executed. Here is what produces this interaction:
    <P>
    There's a sale on. Come to our on-line shop for lots of bargains.
    </P>

    <P>
    <A HREF = "http://www.most-expensive-sellers.com"
      onMouseOver = "window.status = 'Click here to get to
      the bargains!';return >
    </P>
Write down in you own words an explanation of what the above HTML and JavaScript in the anchor tag does.
You can find a discussion of this exercise at the end of the unit.
Note that the status area may not change back once the mouse pointer leaves the anchor, as this behaviour varies among browsers.
Strictly speaking there is something missing from the JavaScript of the onMouseOver event handler. It can be used for other actions than changing the status bar and it is useful for the browser to know whether the URL should be shown in status area (the usual behaviour) or not. For instance, in the first onMouseOver example the URL would still be shown in the status area after the alert dialogue box had been dismissed, especially if Enter had been used — because the mouse pointer would still be over the link. Including a return true statement at the end of the JavaScript 'one-liner' tells the browser that it should not display the URL. Although the status bar is to be occupied by our exhortation to come shopping, it is better to include the return value, as below:
    <A HREF = "http://www.most-expensive-sellers.com"
    onMouseOver = "window.status = 'Click here to get to the bargains!';
      return true;">Come to our cheap on-line store </A>
The use of a return value is a very important part of the above event handler. You will recall from our abstract object model (in Unit 10) that messages to objects can evoke a response. We encountered this with the window.prompt and window.confirm methods that return values. Many event handlers need to return a value for the browser to make use of. In the case in point, true is the response if we do not want the browser to display the URL in the anchor tag — exactly what is required here as we plan to change the status area anyway. However, if we want to see the URL, we must script the event handler to return false, as in the script below that changes the background colour but does not change the status area:
    <A HREF = "http://www.most-expensive-sellers.com"
    onMouseOver = "document.bgColor = 'coral';
      return false">Come to our cheap on-line store</A>
As we have indicated, there is also an event that represents the mouse pointer leaving a link. This 'mouse-out' event is represented by the attribute onMouseOut and the code associated with it is executed when a user moves the mouse pointer away from a link.
Change the scripting in the previous anchor to restore background colour to what it was before being changed to coral. Hint: use a variable to remember the background colour property of the document's state. (You may find it convenient to look again at the discussion of variables in the previous unit.)
You can find a discussion of this exercise at the end of the unit.
The alternative version of the script in the previous exercise shows a common situation for which there is a shorthand notation. The situation is where a variable is declared and soon afterwards it is initialised, i.e. set to a first value, just as in the second version of the previous script. The shorthand allows initialisation at the same point as declaration, for example:
    <SCRIPT>
    var origBgCol = document.bgColor
    </SCRIPT>
Be careful when using variables with handlers. As a general programming rule, you should declare variables close to where you use them. This might suggest that you should declare origBgCol in the handlers for both events, but this does not work because of rules of JavaScript. If handlers need to use the same variable (because they need to use the value the variable holds ) then declare the variable external to the handlers. (See the extension work on this topic)
Implement the JavaScript of Exercise 1 to ensure you are familiar with the concept of handling an event using an HTML attribute.
Modify your implementation to prompt the user for his or her name, and then modify the button label using the button object's value property to include that name. With our current knowledge of JavaScript the button can only be modified in the event handler, so have it change after the first click.
Remember that if your PC or video card is very fast, you will probably not see the colours flashing.
You can find a discussion of this activity at the end of the unit.
Change the HTML/JavaScript that exhorted you to go shopping for bargains (just before Exercise 4) so that when you click on the anchor the window status area changes to the greeting, 'Enjoy your shopping!' To test the JavaScript, return false from the handler to prevent the browser from following the link.
You can find a discussion of this activity at the end of the unit.