Figure 10.1
Table of contents
At the end of this chapter you should be able to:
Know how to capture a range of business rules and store them in a database using declarative constraints.
Describe the use of database triggers in providing an automatic response to the occurrence of specific database events.
Discuss the advantages and drawbacks of the use of database triggers in application development.
Explain how stored procedures can be used to implement processing logic at the database level.
In parallel with this chapter, you should read Chapter 8 of Thomas Connolly and Carolyn Begg, "Database Systems A Practical Approach to Design, Implementation, and Management", (5th edn.).
This chapter introduces you to some of the most advanced features of Relational databases and SQL, namely declarative constraints, database triggers and stored procedures. These features have been made available in popular DBMSs such as Oracle. They provide those DBMSs with greater flexibility and power in dealing with complexities in many demanding business applications.
The reason for studying these advanced database features is that we need to address a growing trend of providing mechanisms for the processing as well as storage of data in database systems. Declarative constraints are a means of recording some types of business rules within a database system, and by doing so, have them systematically applied across all the applications operating on the database. Database triggers and stored procedures are additional mechanisms provided in some of the most powerful DBMSs (e.g. Oracle) for storing and applying logic at the database rather than application level.
The contents of this chapter are closely related to some of the others in this module. The distribution of processing in an application is an area of design that has developed with the evolution of client-server computing. A database designer now has choices about whether to place some aspects of business logic at the server (where the database resides), by having them built into the database system and enforced at that level, or at the client where it is enforced at the application level. This chapter extends the SQL constructs studied in the chapter on Advanced SQL and discusses how business rules can be captured at the database level. Because of the design decisions that need to be made about the placing of business logic, this chapter also relates to the two on database design, and the chapter on distributed databases and client-server applications.
Because different DBMSs may implement those advanced features in different ways, our study will be focused on the related functionality provided by Oracle. Oracle PL/SQL statements will be used to provide examples to enable detailed discussions. Other DBMSs should provide similar functionalities, but you should consult with the system’s documentation should you come across any incompatibilities. All SQL statements are in capital letters.
For any complex database application, it is likely that there will be two or more tables involved to store information. It is also likely that data within the same table or in different tables will have to maintain some kind of relationship to reflect the corresponding business logic. In addition, some attributes (columns) of a table may need to have certain conditions imposed on them, and these conditions, which are often used to capture necessary business rules, need to be satisfied at all times.
In order to accommodate these practical needs of database applications, the SQL standard provides mechanisms to maintain the integrity of databases; that is, the integrity of data within a single table or in different tables as a whole. Declarative constraints are one of such mechanisms. They are used to define, according to the business application rules, conditions on columns and tables. Once defined (i.e. declared), these conditions will be enforced by the DBMS automatically.
As can be seen from the above description, the types of declarative constraints that can be declared are predefined by the DBMS, which conforms to the SQL standard. Usually they are used to store and enforce the kinds of business rules which are generally needed across different applications. Although they are simple to use and maintain, they lack some necessary flexibility and may not always be able to satisfy some specific needs of individual applications. To compensate for this, some DBMSs (e.g. Oracle) provide another type of mechanism to ensure database integrity: database triggers and stored procedures.
A procedure is a set of SQL or PL/SQL (in the case of Oracle) statements used together to execute a particular function. Database triggers are a mechanism that allows a database designer to write procedures that are automatically executed whenever a predefined situation (an event) is raised by the execution of INSERT, UPDATE or DELETE statements on a table or view. Because the database designer is responsible for creating triggers and writing procedures, he/she has an overall control. This control can be used to capture and build business logic into the database as necessary. As a result, this mechanism offers greater flexibility and fewer restrictions for the designer to develop complex database applications. In short, database triggers and procedures are not only able to enforce integrity constraints, but can also be used to write customised functions to satisfy individual applications' needs.
In the rest of this chapter, we are going to study in detail declarative constraints, database triggers and procedures. We will see how they are used in practical applications, what the advantages and drawbacks are, and what the solutions are to potential problems.
To facilitate detailed discussions, suppose we need to implement a database for a university. The basic requirements state that there are four entities: STUDENT, MODULE, LECTURER and DEPT. A student can attend as many modules as necessary, and a module must be attended by at least one student. A module must be taught by one and only one lecturer, but a lecturer may teach between one and four modules. A student should be enrolled to a department; a module should be offered by one and only one department; a lecturer should belong to one and only one department.
It is not difficult to see that we will need to implement five tables: four tables for the four entities and one table (called RECORD) for the many-to-many relationship between STUDENT and MODULE.
STUDENT (SID, SNAME, DNAME, SLEVEL, SEMAIL).
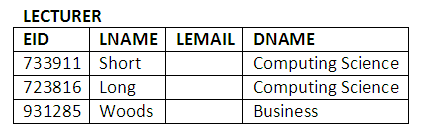
LECTURER (EID, LNAME, LEMAIL, DNAME).
MODULE (CODE, TITLE, EID, DNAME).
DEPT (DNAME, LOCATION).
RECORD (SID, CODE, MARK).
In the STUDENT table, SID is the student’s identity number and the primary key, SNAME is the student’s name, DNAME is the department to which the student has enrolled, SLEVEL is the level the student is at, and SEMAIL is the student’s email address. In the LECTURER table, EID is the employee identity number for the lecturer and the primary key, LNAME is the lecturer’s name, LEMAIL is the lecturer’s email address and ENAME is the name of the department. In the MODULE table, CODE is the code of the module and the primary key, TITLE is the title of the module, EID is the name of the lecturer taking the module and DNAME is the name of the department the module belongs to. The DEPT table has only two attributes, department name DNAME (primary key) and location of the department in the university. In the RECORD table, SID is the student number, CODE is the code of the module and MARK is the mark a student obtained from attending a module. The SID and CODE makes a primary key.
Constraints are a mechanism provided within the DDL SQL standard to maintain the consistency and integrity of a database and, at the same time, enforce certain business rules in the database application. There are five different types of declarative constraints in SQL that can be defined on a database column within a table, and they are as follows:
PRIMARY KEY
NOT NULL
UNIQUE
CHECK
FOREIGN KEY
The PRIMARY KEY constraint is used to maintain the so-called entity integrity. When such a constraint is declared on a column of a table, the DBMS enforces the following rules:
The column value must be unique within the table.
The value must exist for any tuple (a record or a row of data) that is to be stored in the table. That is, the column cannot have a NULL value.
For the STUDENT table in our university database, for example, we have SID as the key attribute. As a normal business rule, all students must have a valid and unique ID number as soon as they are enrolled. Thus, the SID column must have a unique value and cannot be null. To enforce this business rule, we can have the PRIMARY KEY constraint declared on the column when creating the STUDENT table. One way to do this is:
CREATE TABLE STUDENT (
SID NUMBER(5) CONSTRAINT PK_STUDENT PRIMARY KEY,
SNAME VARCHAR2(30),
DNAME VARCHAR2(30),
SLEVEL NUMBER(1),
SEMAIL VARCHAR2(40));
In the above SQL statement, the constraint is declared by using the keywords CONSTRAINT and PRIMARY KEY. A column definition clause with such a constraint declaration is called a column constraint clause. "PK_STUDENT" is a user-defined name for the constraint. It is optional, but when defined, it can help the database designer and user to pinpoint a violation of this constraint. The reason is that when this particular constraint is violated, the DBMS will generate an error/warning message which includes the constraint’s name. A usual convention for defining a PRIMARY KEY constraint’s name is "PK_Table_Name".
There is an alternative way to declare the PRIMARY KEY constraint:
CREATE TABLE STUDENT (
SID NUMBER(5),
SNAME VARCHAR2(30),
DNAME VARCHAR2(30),
SLEVEL NUMBER(1),
SEMAIL VARCHAR2(40),
CONSTRAINT PK_STUDENT PRIMARY KEY (SID));
OR
CREATE TABLE STUDENT (
SID NUMBER(5),
SNAME VARCHAR2(30),
DNAME VARCHAR2(30),
SLEVEL NUMBER(1),
SEMAIL VARCHAR2(40),
PRIMARY KEY (SID));
In this SQL statement, a separate clause (called table constraint clause) is used to define the constraint. The column name (e.g. SID) must be explicitly stated in the list (i.e. within the brackets ( )). If the table has a composite key, then the list will include all the key attributes. For example, to create the RECORD table, we have:
CREATE TABLE RECORD (
SID NUMBER(5),
CODE VARCHAR2(6),
MARK NUMBER(3),
CONSTRAINT PK_RECORD PRIMARY KEY (SID, CODE));
By enforcing the PRIMARY KEY constraint, the DBMS can prevent any attempt or mistake of inserting or updating a student record with a duplicate student number. It also ensures that every student on record has a valid ID number. In the RECORD table, it ensures that each record has a unique combination of SID and CODE values, which means that a student will never be allowed to have two or more records for the same module.
It must be emphasised that a table can have at most one PRIMARY KEY constraint, and it is actually optional (a table does not have to have a PRIMARY KEY constraint). However, it is rare that a table be created without such a constraint, because tables usually do have a primary key.
Review question 1
What types of constraints can be declared in SQL?
What rules are enforced by the PRIMARY KEY constraint?
Is it true that a table must have at least one PRIMARY KEY constraint?
The NOT NULL constraint is imposed on any column that must have a value. In the STUDENT table, for example, the attributes DNAME and SLEVEL can have this constraint declared on them to reflect the application requirement that whenever a student is enrolled, he/she must be assigned to a department and be at a certain level.
To declare the constraint on DNAME and SLEVEL, we can use the following SQL statement to create table STUDENT:
CREATE TABLE STUDENT (
SID NUMBER(5),
SNAME VARCHAR2(30),
DNAME VARCHAR2(30) CONSTRAINT NN_STUDENT_DNAME NOT NULL,
SLEVEL NUMBER(1) NOT NULL,
SEMAIL VARCHAR2(40),
CONSTRAINT PK_STUDENT PRIMARY KEY (SID));
You may have noticed that the constraint on DNAME has been given a user-defined name "NN_STUDENT_DNAME", while the one on SLEVEL has not. It is optional to name a NOT NULL constraint. Unlike the PRIMARY KEY constraint, it does not make much difference whether or not you choose to define a name for the constraint. In Oracle, when the NOT NULL constraint is violated, the system will generate an error message. However, this message will not include the name of the NOT NULL constraint, even if one is defined.
Also notice that when a constraint is not to be given a user-defined name, the keyword CONSTRAINT is not used. The same applies to other constraint definitions.
The UNIQUE constraint is the same as the PRIMARY KEY constraint, except NULL values are allowed. In the STUDENT table, for example, the SEMAIL attribute should have this constraint. The reason is that according to the university’s policy, a student may or may not be given an email account. However, when one is given, the email account name must be unique. By enforcing this constraint on SEMAIL, the DBMS can ensure that different students will not be allowed to have the same email addresses. For those who do not have an email account, the SEMAIL column can have NULL values.
To declare the UNIQUE constraint on SEMAIL, we can use the following SQL statement to create table STUDENT:
CREATE TABLE STUDENT (
SID NUMBER(5),
SNAME VARCHAR2(30),
DNAME VARCHAR2(30) NOT NULL,
SLEVEL NUMBER(1) NOT NULL,
SEMAIL VARCHAR2(40) CONSTRAINT UK_STUDENT_SEMAIL UNIQUE,
CONSTRAINT PK_STUDENT PRIMARY KEY (SID));
Again, an optional user-defined name "UK_STUDENT_SEAMIL" is given to the constraint. This is a good practice in Oracle, because when the UNIQUE constraint is violated, the system will generate an error message containing the name. Similar to the PRIMARY KEY constraint, the constraint’s name helps pinpoint the violation. You can avoid giving the constraint a name and just use the UNIQUE keyword:
SEMAIL VARCHAR2(40) UNIQUE
Review question 2
Why is it a good practice to give a name to a declarative constraint?
The CHECK constraint defines a discrete list of values that a column can have. This list of values may be literally expressed within the constraint declaration or may be defined using a mathematical expression. In the STUDENT table, for example, a student must be at a level between 0 and 3. To impose such a constraint, the CREATE statement for the STUDENT table will be as follows:
CREATE TABLE STUDENT (
SID NUMBER(5),
SNAME VARCHAR2(30),
DNAME VARCHAR2(30) NOT NULL,
SLEVEL NUMBER(1) NOT NULL CONSTRAINT CK_STUDENT_LEVEL CHECK ((SLEVEL>=0) AND (SLEVEL<=3)),
SEMAIL VARCHAR2(40) CONSTRAINT UK_STUDENT_SEMAIL UNIQUE,
CONSTRAINT PK_STUDENT PRIMARY KEY (SID));
Notice two things in the above CREATE statement. First, the CHECK constraint can be declared in a column constraint clause and concatenated (linked) with other NOT NULL, UNIQUE and/or PRIMARY KEY constraints. When a column constraint clause is concatenated, there is no separator between the different constraints, just a comma after the last constraint. Second, the check condition (e.g. (SLEVEL>=0) AND (SLEVEL<=3)) can include logical connectors such as AND and OR. Thus, it is possible to define a complex condition.
Alternatively, the CHECK constraint can be defined using a table constraint clause, such as:
CREATE TABLE STUDENT (
SID NUMBER(5),
SNAME VARCHAR2(30),
DNAME VARCHAR2(30) NOT NULL,
SLEVEL NUMBER(1) NOT NULL,
SEMAIL VARCHAR2(40) CONSTRAINT UK_STUDENT_SEMAIL UNIQUE,
CONSTRAINT PK_STUDENT PRIMARY KEY (SID),
CONSTRAINT CK_STUDENT_LEVEL CHECK ((SLEVEL>=0) AND (SLEVEL<=3)));
It is worth mentioning that when the CHECK constraint is applied to a list of literal values, the values are case sensitive. For example, if only students in the Department of Computing Science or Information Technology are allowed to be in the database, a CHECK constraint is defined on DNAME in the following way:
……
DNAME VARCHAR2(30) NOT NULL, ……,
CHECK (DNAME IN (‘Computing Science’, ‘Information Technology’)), ……;
Any value that does not exactly match the specified values (including ‘Computing science’) will cause a violation.
It is also possible to create a CHECK constraint that is constructed from multiple columns of the table. In this case, because it applies to more than one column, the constraint must be declared with a table constraint clause rather than a column constraint clause. For example, instead of declaring two CHECK constraints on SLEVEL and DNAME respectively, we can use a single constraint called CK_STUDENT_VALIDITY as follows:
CREATE TABLE STUDENT ( SID NUMBER(5),
SNAME VARCHAR2(30),
DNAME VARCHAR2(30) NOT NULL,
SLEVEL NUMBER(1) NOT NULL,
SEMAIL VARCHAR2(40) CONSTRAINT UK_STUDENT_SEMAIL UNIQUE,
CONSTRAINT PK_STUDENT PRIMARY KEY (SID),
CONSTRAINT CK_STUDENT_VALIDITY CHECK (((SLEVEL>=0) AND (SLEVEL<=3))
AND (DNAME IN (‘Computing Science’, ‘Information Technology’))));
This CREATE statement will create the same STUDENT table as the earlier statement that uses two separate CHECK constraints.
Review question 3
What is the purpose of using a CHECK constraint?
We saw in earlier chapters, when introducing the Relational model, that entities are often linked by a one-to-many relationship. For example, a department may contain many employees, so we say there is a one-to-many relationship between instances of the department entity and instances of the employee entity. Entities related in this way are sometimes referred to as parents and children; in the example above, the parent entity would be the department table, and the employee entity would be the child table.
A foreign key is a column or a set of columns (attributes) that links each row in the child table containing the foreign key to the row of the parent table containing the matching key value. The FOREIGN KEY constraint enforces referential integrity, which means that, if the foreign key contains a value, that value must refer to an existing, valid row in the parent table.
In our university database, for example, SID and CODE are foreign keys in the RECORD table (notice that SID and CODE together form the primary key for RECORD as well), and RECORD has two parent tables STUDENT and MODULE. For a row in RECORD, there must be an existing student row with the same SID value in STUDENT, and a valid row in MODULE with the same CODE value. Otherwise, the referential integrity is broken. One important implication of this, is that when using FOREIGN KEY constraints, the parent tables must be created before the child tables, and the parent tables must be populated before the child tables, in order to avoid constraint violations. It is important to bear in mind this required order of doing things when undertaking practical work involving FOREIGN KEY constraints.
The following SQL statement can be used to declare the FOREIGN KEY constraints on SID and CODE when creating the RECORD table.
CREATE TABLE RECORD (
SID NUMBER(5),
CODE VARCHAR2(6),
MARK NUMBER(3),
CONSTRAINT PK_RECORD PRIMARY KEY (SID, CODE),
CONSTRAINT FK_RECORD_SID FOREIGN KEY (SID) REFERENCES STUDENT,
FOREIGN KEY (CODE) REFERENCES MODULE);
It can be seen from the above example that:
The FOREIGN KEY constraint can be given an optional name. In the example, FK_RECORD_SID is the name for the constraint on SID. To define the name, the keyword CONSTRAINT must be used. Otherwise, it is omitted as in the case of declaring the constraint on CODE.
The keywords FOREIGN KEY define which column (or columns) is the foreign key column to be constrained.
The keyword REFERENCES indicates the parent table.
By declaring and enforcing the FOREIGN KEY constraint, the DBMS can ensure that the referential integrity is maintained in both the child table(s) and the parent table(s).
In the child table, the DBMS will not allow any INSERT or UPDATE operation that attempts to create a foreign key value without a matching candidate key value in the corresponding parent table (as indicated by the REFERENCES clause).
In the parent table, the DBMS ensures that appropriate actions are taken for any UPDATE or DELETE operation that attempts to change or delete a candidate key value that is being referenced by some rows in the child table. The kind of actions that can be taken are user definable. They are CASCADE, SET NULL, SET DEFAULT and NO ACTION.
This action can be triggered by either a DELETE or an UPDATE operation.
When a parent row is deleted, all its child rows are also deleted. This action can subsequently be applied to each child row deleted, because such rows may themselves have a candidate key that is used as a foreign key in some other tables. Thus, this action may be executed in a cascading manner.
The CASCADE option can be specified in SQL as follows:
CREATE TABLE RECORD (
SID NUMBER(5),
CODE VARCHAR2(6),
MARK NUMBER(3),
CONSTRAINT PK_RECORD PRIMARY KEY (SID, CODE),
FOREIGN KEY (SID) REFERENCES STUDENT ON DELETE CASCADE,
FOREIGN KEY (CODE) REFERENCES MODULE);
In this example, when a student row is deleted from the STUDENT table, all his/her records will also be removed from the RECORD table.
When the candidate key value is changed (by a UPDATE operation), the foreign key column in the child table is set to the same new value. Similar to CASCADE by DELETE, such update actions can be carried out in a cascading manner to the child tables of the child table and so on. For example, when a student’s identity number (SID) is changed, all his/her records in the RECORD table should have the new SID value to replace the old. In Oracle, such an action can be defined by creating a trigger (to be discussed later).
When a row is deleted from the parent table, all its child rows will have their corresponding foreign key column set to NULL. This option is only valid if the foreign key column allows NULL value (i.e. it has neither the PRIMARY KEY constraint nor the NOT NULL constraint).
Similarly, when the candidate key value of the parent row is changed, all its child rows may have their corresponding foreign key column set to NULL. Again, this option is valid if and only if the foreign key column allows NULL value.
The SET NULL option can be specified in Oracle by creating corresponding triggers.
By having this option, the operation of deleting the parent row or updating the candidate key value in the parent table will set the corresponding foreign key column in the child table to its default value. This option is only valid if the foreign key column has a DEFAULT value specified.
Again in Oracle, this option can be implemented using appropriate triggers.
This is the option by default. If there is no other option specified, the DBMS will reject any DELETE or UPDATE in the parent table that may affect rows in the child tables. Any such illegal attempt (to break the referential integrity) will raise an error message in Oracle.
Review question 4
Does the keyword CONSTRAINT always need to be used in declaring a constraint?
What are the rules enforced by the FOREIGN KEY constraint?
Activity 1 - Creating tables with appropriate constraints
For the university database described in the Context section, we now want to use SQL to create five tables as specified below:
STUDENT
SID: a five-digit number, which is also the primary key of the table.
SNAME: a string of characters; maximum length is 30.
SLEVEL: a single-digit integer; must have a value.
SEMAIL: a string of characters; maximum length is 40; must be unique.
DNAME: foreign key referring to the DEPT table; must have a value.
MODULE
CODE: a string of 6 letters and/or numbers; primary key of the table.
TITLE: a string of characters; maximum length is 45; must be unique.
EID: foreign key referring to the LECTURER table; must have a value.
DNAME: foreign key referring to the DEPT table; must have a value.
LECTURER
EID: a six-digit number; primary key of the table.
LNAME: a string of characters; maximum length is 30.
LEMAIL: a string of characters; maximum length is 40; must be unique.
DNAME: foreign key referring to the DEPT table; must have a value.
DEPT
DNAME: a string of characters; maximum length is 30; primary key of the table.
LOCATION: a string of characters; maximum length is 35; must have a value.
RECORD
SID: foreign key referring to the STUDENT table; primary key attribute.
CODE: foreign key referring to the MODULE table; primary key attribute.
MARK: an integer.
Activity 2 - Inserting data into the tables and enforcing constraints
Having created the five tables, we can now insert data records into them. The records that are to be stored are listed below. Insert each of them and see what happens after the insertion of the highlighted rows, bearing in mind the constraints that some of the columns may have.
Figure 10.1
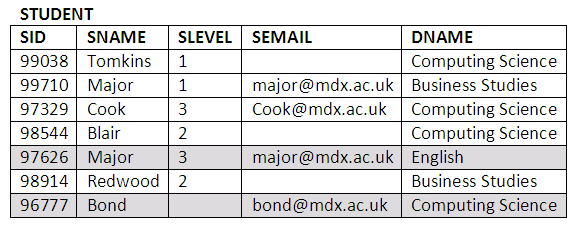
Figure 10.2
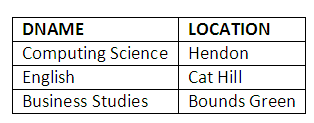
Figure 10.3
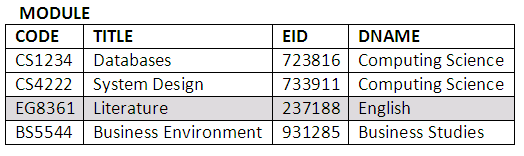
Figure 10.4
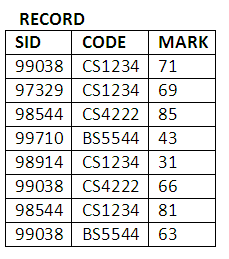
Figure 10.5
Activity 3 - Maintaining referential integrity
We have learned that by declaring and enforcing the FOREIGN KEY constraint, the DBMS can ensure that the referential integrity is maintained in both the child table(s) and the parent table(s).
In the child table, the DBMS will not allow any INSERT or UPDATE operation that attempts to create a foreign key value without a matching candidate key value in the corresponding parent table (as indicated by the REFERENCES clause). We have seen one of such examples in Activity 2.
In the parent table, the DBMS ensures that appropriate actions are taken for any UPDATE or DELETE operation that attempts to change or delete a candidate key value that is being referenced by some rows in the child table.
Now try to perform the following two operations on our university database and see what happens:
Operation 1: Change the name of the Department of Computing Science to simply ‘Computing’ in the DEPT table.
Operation 2: Delete all level 3 students from the STUDENT table.
Once created, a table’s definition can still be changed using the ALTER TABLE command in SQL. Different DBMSs implement ALTER TABLE differently, providing more or less functionality than that specified in the SQL standard. In Oracle, the following operations can be carried out on a table using appropriate ALTER TABLE statements:
Add a new column, including a constraint declaration for that column.
Modify an existing column’s type, with certain restrictions.
Modify an existing column’s constraint definition, with certain restrictions.
Add a new constraint to an existing column.
Drop (remove) an existing constraint from a column.
Suppose we now want to create a new column in the RECORD table to store the date on which the mark was obtained. The column is to be named EXAM_DATE, and can be added in the following way:
ALTER TABLE RECORD
ADD EXAM_DATE DATE;
If there is an application requirement stating that the exam date must not be earlier than 1st January 1998 in order for the mark to be valid, we can include a CHECK constraint as well when creating the new column. In this case, the following SQL statement is used instead of the previous one:
ALTER TABLE RECORD
ADD EXAM_DATE DATE CONSTRAINT CK_RECORD_DATE CHECK (TO_CHAR(EXAM_DATE, ‘YYMMDD’) >= ‘980101’);
The constraint is given a name "CK_RECORD_DATE". The system function TO_CHAR is used to convert EXAM_DATE into a string so that it can be compared with ‘980101’, representing 1st January 1998. Other constrains can be specified in the column constraint clause in a similar way.
Using the ALTER TABLE command, we can modify the type definition of a column with the following restrictions:
If there is data (except NULL) present in the column, then the type of this column cannot be changed. The type definition can only be changed if the table is empty, or all values in the column concerned are NULL.
If the type definition is changed on a column with a UNIQUE or PRIMARY KEY constraint, it may potentially become incompatible with the data type of a referencing FOREIGN KEY. Thus, the ALTER TABLE command should be used with caution.
The following SQL statement changes the data type of SID in the RECORD table to NUMBER(9) (the original type was NUMBER(5)):
ALTER TABLE RECORD
MODIFY SID NUMBER(9);
Notice that SID in RECORD is a foreign key referencing SID in STUDENT which still has the type NUMBER(5). However, because NUMBER(9) and NUMBER(5) are compatible, this ALTER TABLE operation is allowed. If we attempt to change SID to be of type VARCHAR2(5), it will be rejected because of incompatible data types.
There are a number of possibilities for modifying a constraint definition. If a column has the NOT NULL constraint, it can be changed to NULL to allow null values, and vice versa.
For example, the SEMAIL column in the STUDENT table did allow NULL values. If we wish to change this, the following SQL statement is used:
ALTER TABLE STUDENT MODIFY SEMAIL NOT NULL;
Notice that the above operation is valid if and only if the table is empty or the SEMAIL column does not have any NULL value. Otherwise, the operation is rejected.
The SEMAIL column can also be changed back to allow NULL values as following:
ALTER TABLE STUDENT MODIFY SEMAIL NULL;
For other existing constraints (i.e. UNIQUE, CHECK and FOREIGN KEY), if they need be changed, they have to be removed first (DROP) and then new ones added (ADD).
New constraints, such as UNIQUE, CHECK and FOREIGN KEY, can be added to a column.
In our university database, for example, we may add a UNIQUE constraint on SNAME in the STUDENT table. As a result, no students can have the same name in the database.
ALTER TABLE STUDENT
ADD CONSTRAINT UK_STUDENT_SNAME UNIQUE(SNAME);
In the RECORD table, if we want to ensure that MARK is always less than or equal to 100, we can add a CHECK constraint on MARK as follows:
ALTER TABLE RECORD ADD CONSTRAINT CK_RECORD_MARK CHECK (MARK <= 100);
In the LECTURER table, DNAME is a foreign key with a link to the DEPT table. If we did not declare a FOREIGN KEY constraint on DNAME when creating LECTURER, we can add it now using the following statement:
ALTER TABLE LECTURER
ADD CONSTRAINT FK_LECTURER_DNAME
FOREIGN KEY (DNAME) REFERENCES DEPT;
All the keywords in the statements are highlighted. Notice that we have given names to all the newly added constraints. They will be helpful when constraints have to be dropped.
The ALTER TABLE … DROP command is used to remove an existing constraint from a column. This operation is effectively to delete its definition from the data dictionary of the database.
Earlier, we added a UNIQUE constraint (named UK_STUDENT_SNAME) on SNAME in the STUDENT table. It prevents any students having the same name. Obviously it is not practically useful, because it is always possible that some students may happen to have the same name. In order to remove this constraint, we can use the following SQL statement:
ALTER TABLE STUDENT DROP CONSTRAINT UK_STUDENT_SNAME;
Notice that in order to drop a constraint, its name has to be specified in the DROP clause. There is no difficulty if the constraint has a user-defined name. However, if the user does not give a name to the constraint when it is declared, the DBMS will automatically assign a name to it. To remove such a constraint, the system-assigned name has to be found out first. It can be done in Oracle, but it causes some unnecessary trouble. This may be another incentive to define a name for a constraint when it is declared.
Review question 5
How does one change the definition of a constraint on a column?
How does one remove an existing constraint?
Activity 4 - Changing an existing column's constraint
In Activity 2, when we were trying to insert the following record:

Figure 10.6
into the STUDENT table, an error occurred. This was because there was a NOT NULL constraint declared on SLEVEL. As a result, the SLEVEL column cannot take NULL values. The insertion did not take place.
In this activity, we will change the constraint on SLEVEL from NOT NULL to NULL so that NULL value is allowed. Write an SQL statement to perform the change and then re-insert the record into the STUDENT table. It should now be held in the table.
Activity 5 - Adding a new constraint to a column
When the RECORD table was created, there was no constraint on MARK. As a normal business rule, however, we know that a student’s mark should always be between 0 and 100. Thus, we can declare an appropriate constraint to enforce this rule. Since the RECORD table has already been created, we need to use the ALTER TABLE command to add the new constraint.
Write a proper SQL statement to perform the required operation. Having added the new constraint, try to increase all the marks in module CS1234 by 80 and see what happens.
Activity 6 - Modifying an existing FOREIGN KEY constraint
In Activity 3, we could not delete level 3 students from the STUDENT table, because they were still being referenced by some child rows via the foreign key SID in the RECORD table.
Now suppose that we want to relax the constraint a bit so that we may remove student rows from the STUDENT table together with their child rows. In this case, the FOREIGN KEY constraint on SID in RECORD needs be changed to include the option to allow cascade deletions.
Write proper SQL statements to perform the required modification. Remember that for existing constraints such as FOREIGN KEY, UNIQUE and CHECK, if they need be modified, they have to be removed first and then new ones added.
Now, having modified the constraint, perform the operation to delete all level 3 students from the STUDENT table. Then check both the STUDENT and RECORD tables to see what rows have been deleted.
A trigger defines an action the database should take when some database-related event occurs. Triggers may be used to:
Supplement declarative constraints, to maintain database integrity.
Enforce complex business rules.
Audit changes to data.
Different DBMSs may implement the trigger mechanism differently. In this chapter, we use Oracle to discuss triggers. In Oracle, a trigger consists of a set of PL/SQL statements. The execution of triggers is transparent to the user. They are executed by the DBMS when specific types of data manipulation commands are performed on specific tables. Such commands include INSERT, UPDATE and DELETE.
Because of their flexibility, triggers may supplement database integrity constraints. However, they should not be used to replace them. When enforcing business rules in an application, you should first rely on the declarative constraints available in the DBMS (e.g. Oracle); only use triggers to enforce rules that cannot be coded through declarative constraints. This is because the enforcement of the declarative constraints is more efficient than the execution of user-created triggers.
It is worth mentioning that in order to create a trigger on a table, you must be able to alter that table and any other table that may subsequently be affected by the trigger’s action. You need to ensure that you have sufficient privilege to do so.
In Oracle, there are fourteen types of triggers that can be implemented using PL/SQL. Once again, note that other DBMSs may not have the same support, and that you should consult your system’s documentation if you encounter any problems. The type of a trigger is defined by the following three features:
Event
Level
Timing
Refers to the triggering SQL statement; that is, INSERT, UPDATE or DELETE. A single trigger can be designed to fire on any combination of these SQL statements.
Refers to statement-level versus row-level triggers. The level of a trigger denotes whether the trigger fires once per SQL statement or once for each row affected by the SQL statement.
Statement-level triggers execute once for each SQL statement. For example, if an UPDATE statement updates 300 rows in a table, the statement-level trigger of that table would only be executed once. Thus, these triggers are not often used for data-related activities. Instead, they are normally used to enforce additional security measures on the types of transactions that may be performed on a table.
Statement-level triggers are the default type of triggers created via the CREATE TRIGGER command.
Row-level triggers execute once for each row operated upon by a SQL statement. For example, if an UPDATE statement updates 300 rows in a table, the row-level trigger of that table would be executed 300 times. Also, row-level triggers have access to column values of the row currently being operated upon by the SQL statement. They can evaluate the contents of each column for that row. Thus, they are the most common type of triggers and are often used in data-auditing applications.
Row-level triggers are created using the FOR EACH ROW clause in the CREATE TRIGGER command.
It is important to know that a trigger can only be associated with one table, but a table can have a mixture of different types of triggers.
Timing denotes whether the trigger fires BEFORE or AFTER the statement-level or row-level execution. In other words, triggers can be set to occur immediately before or after those triggering events (i.e. INSERT, UPDATE and DELETE).
Within the trigger, one will be able to reference the old and new values involved in the transaction. 'Old' refers to the data as it existed prior to the transaction. UPDATE and DELETE operations usually reference such old values. 'New' values are the data values that the transaction creates (such as being INSERTed).
If one needs to set a column value in an inserted row via a trigger, then a BEFORE INSERT trigger is required in order to access the 'new' values. Using an AFTER INSERT trigger would not allow one to set the inserted value, since the row will already have been inserted into the table. For example, the BEFORE INSERT trigger can be used to check if the column values to be inserted are valid or not. If there is an invalid value (according to some pre-specified business rules), the trigger can take action to modify it. Then only validated values will be inserted into the table.
AFTER row-level triggers are often used in auditing applications, since they do not fire until the row has been modified. Because the row has been successfully modified, it implies that it has satisfied the referential integrity constraints defined for that table.
In Oracle, there is a special BEFORE type of trigger called an INSTEAD OF trigger. Using an INSTEAD OF trigger, one can instruct Oracle what to do instead of executing the SQL statement that has activated the trigger. The code in the INSTEAD OF trigger is executed in place of the INSERT, UPDATE or DELETE triggering transaction.
To summarise, the fourteen types of triggers are listed below.
Triggered by INSERT:
BEFORE INSERT statement-level.
BEFORE INSERT row-level.
AFTER INSERT statement-level.
AFTER INSERT row-level.
Triggered by UPDATE:
BEFORE UPDATE statement-level.
BEFORE UPDATE row-level.
AFTER UPDATE statement-level.
AFTER UPDATE row-level.
Triggered by DELETE:
BEFORE DELETE statement-level.
BEFORE DELETE row-level.
AFTER DELETE statement-level.
AFTER DELETE row-level.
To replace the triggering event:
INSTEAD OF statement-level.
INSTEAD OF row-level.
The first twelve types of triggers are most commonly used, and are discussed in this chapter. The INSTEAD OF triggers are more complex than others, and interested students are advised to refer to books specifically dealing with Oracle PL/SQL programming.
Review question 6
What is a database trigger? Should triggers be used to replace declarative constraints and why?
Instead of presenting a formal syntax for creating triggers, a number of examples are used to illustrate how different types of triggers are created.
This type of trigger is created in the following way:
CREATE TRIGGER first_trigger_on_student
BEFORE INSERT ON STUDENT BEGIN
[the trigger body consisting of PL/SQL code;]
END;
The CREATE TRIGGER clause must define the trigger’s name. In the example, it is called "first_trigger_on_student". In practice, the name must be something that can reflect what the trigger does. In this sense, "first_trigger_on_student" is not a good choice of name, but merely for convenience of illustrating the syntax.
In the next clause (after CREATE TRIGGER), the timing and triggering event must be specified. In our example, the trigger will fire BEFORE (timing) any INSERT (event) operation ON the STUDENT table. Obviously, timing can also be AFTER, and event be UPDATE or DELETE.
The last part of a trigger definition is the BEGIN/END block containing PL/SQL code. It specifies what action will be taken after the trigger is invoked.
In the above example, instead of defining a single triggering event (INSERT), a combination of the three events may be specified as follows:
CREATE OR REPLACE TRIGGER first_trigger_on_student
BEFORE INSERT OR UPDATE OR DELETE ON STUDENT BEGIN
[the trigger body consisting of PL/SQL code;]
END;
In this case, any of the INSERT UPDATE, and DELETE operations will activate the trigger. Also notice that instead of using a CREATE TRIGGER clause, we use CREATE OR REPLACE TRIGGER. Because the "first_trigger_on_student" trigger is already in existence, the keywords CREATE OR REPLACE are used. For defining new triggers, the keyword CREATE alone is sufficient
If the timing and triggering event are simply defined as
BEFORE UPDATE ON STUDENT
then UPDATE on any column will fire the trigger. In Oracle, we have the option to specify a particular column whose update will activate the trigger. Updates on other columns will have no effects on the trigger.
For example, we can define a trigger specifically for UPDATE on DNAME in the STUDENT table (meaning whenever a student changes department, the trigger fires). This trigger is called "second_trigger_on_student".
CREATE TRIGGER second_trigger_on_student
BEFORE UPDATE OF DNAME ON STUDENT
BEGIN [the trigger body consisting of PL/SQL code;]
END;
Notice the option "OF column’s name" is used for the UPDATE operation.
To define a row-level trigger, the FOR EACH ROW clause must be included in the CREATE TRIGGER statement. For example, if we want to have a trigger for each INSERT, UPDATE and DELETE operation on every row that is affected, we can create the trigger in the following way:
CREATE TRIGGER third_trigger_on_student
AFTER INSERT OR UPDATE OR DELETE ON STUDENT
FOR EACH ROW
BEGIN
[the trigger body consisting of PL/SQL code;]
END;
The trigger will fire whenever a row has been inserted, updated or deleted. At the row-level, we can also add the option for the UPDATE event.
CREATE OR REPLACE TRIGGER third_trigger_on_student
AFTER INSERT OR UPDATE OF DNAME OR DELETE ON STUDENT
FOR EACH ROW
BEGIN
[the trigger body consisting of PL/SQL code;]
END;
For row-level triggers, there is another optional clause which can be used to further specify the exact condition for which the trigger should fire. This is the "WHEN ‘condition’" clause. The ‘condition’ must be evaluated to be TRUE for the trigger to fire. If it is evaluated to be FALSE or does not evaluate because of NULL values, the trigger will not fire.
For example, if we want to take some action when a student is moved to the Department of Computing Science, we can define a trigger like the following:
CREATE TRIGGER fourth_trigger_on_student
AFTER UPDATE OF DNAME ON STUDENT
FOR EACH ROW WHEN (NEW.DNAME = ‘Computing Science’)
BEGIN
[the trigger body consisting of PL/SQL code;]
END;
Notice how the WHEN clause is used to specify the exact condition for the trigger to fire. The ‘condition’ can be a complex Boolean expression connected by AND/OR logical operators.
Also, the notation "NEW.column_name" (such as NEW.DNAME) refers to the column (e.g. DNAME) which has a new value as a result of an INSERT or UPDATE operation. Similarly, the notation "OLD.column_name" refers to the column which still has the old value prior to an UPDATE or DELETE operation. These two notations are very useful for maintaining data integrity. (Note that in the BEGIN … END block, a colon ‘:’ needs to be placed before OLD and NEW.)
Another example: Suppose we want to take some action when a student is to leave the Department of English. We can define an appropriate trigger in the following way:
CREATE TRIGGER fifth_trigger_on_student
BEFORE UPDATE OF DNAME OR DELETE ON STUDENT
FOR EACH ROW WHEN (OLD.DNAME = ‘English’)
BEGIN
[the trigger body consisting of PL/SQL code;]
END;
Compare "fifth_trigger_on_student" with "fourth_trigger_on_student", and see how they are different.
Existing triggers can be deleted via the DROP TRIGGER command. For example, the "first_trigger_on_student" trigger is removed from the STUDENT table in the following way:
DROP TRIGGER first_trigger_on_student;
As studied in the earlier part of this chapter, the FOREIGN KEY constraint is often used for ensuring the referential integrity among parent and child tables. However, the FOREIGN KEY constraint can only enforce standard integrity rules. They are:
The foreign key column in the child table cannot reference non-existing rows in the parent table.
If the DELETE CASCADE option is not chosen, a row in the parent table that is being referenced via a foreign key column cannot be deleted.
If the DELETE CASCADE option is chosen, the row can be deleted together with all the rows in the child table which reference the parent row.
If other non-standard rules have to be enforced as well, then appropriate triggers need to be created. Some possible non-standard rules are:
Cascade updates.
Set the foreign key column to NULL on updates and deletes.
Set a default value to the foreign key column on updates and deletes. The meanings of these rules have been explained before.
It must be emphasised that if triggers are used instead of the standard FOREIGN KEY constraint, then for each of the integrity rules (standard and non-standard), one or more triggers may need to be implemented. Also, the FOREIGN KEY constraint must not be declared when creating the corresponding tables. Otherwise, the triggers will not work, because the standard FOREIGN KEY constraint will override the trigger actions.
In this section, we are going to see two examples of using triggers to implement the DELETE CASCADE rule and the UPDATE CASCADE rule. The two tables concerned are STUDENT and RECORD:
STUDENT(SID, SNAME, DNAME, SLEVEL, SEMAIL)
RECORD(SID, CODE, MARK)
We know that SID in RECORD is a foreign key linking to STUDENT.
To create the trigger to cascade deletes:
CREATE TRIGGER cascade_deletes_student_record
BEFORE DELETE ON STUDENT
FOR EACH ROW
BEGIN
DELETE FROM RECORD
WHERE RECORD.SID = :OLD.SID;
END;
It can be seen from the above example that, before the parent row is deleted from the STUDENT table, all the child rows in the RECORD table are deleted. This maintains the referential integrity. (In the PL/ SQL code, :OLD.SID represents the SID of the row in the STUDENT table, which is to be deleted.)
To create the trigger to cascade updates:
CREATE TRIGGER cascade_updates_student_record
AFTER UPDATE OF SID ON STUDENT
FOR EACH ROW
BEGIN
UPDATE RECORD
SET RECORD.SID = :NEW.SID
WHERE RECORD.SID = :OLD.SID;
END;
Again, it can be seen from the example that, after the parent row is updated in the STUDENT table, all the child rows in the RECORD table are updated accordingly. This maintains the referential integrity.
In the Context section, it was mentioned that in the university database, a lecturer can teach no more than four modules (i.e. this is a business rule). This restriction can be enforced by defining a trigger on the MODULE table to ensure that no lecturer has more than four corresponding rows in the table. The MODULE table’s structure is as following:
MODULE(CODE, TITLE, EID, DNAME)
To create the trigger,
CREATE TRIGGER max_teaching_load
BEFORE INSERT OR UPDATE OF EID ON MODULE
FOR EACH ROW
DECLARE NO_OF_MODULES INTEGER(1);
BEGIN
SELECT COUNT(*) INTO NO_OF_MODULES
FROM MODULE
WHERE MODULE.EID = :NEW.EID;
IF NO_OF_MODULES >= 4 THEN
RAISE_APPLICATION_ERROR(-20001, ‘Maximum teaching load exceeded for this lecturer!’);
END IF;
END;
In the above code, the DECLARE NO_OF_MODULES INTEGER(1) clause defines an integer variable called NO_OF_MODULES.
In this example, the key point is that we use the RAISE_APPLICATION_ERROR procedure (system provided) to generate an error message and stop the execution of any INSERT or UPDATE OF EID operation which may result in a lecturer teaching more than four modules. In RAISE_APPLICATION_ERROR, the number -20001 is a user-defined error number for the condition (the number must be between –20001 and –20999), and the text in single quotes is the error message to be displayed on the screen.
Now suppose that the university has another rule stating that a student’s mark cannot be changed by more than 10% of the original mark. In this case, we can define a trigger on the RECORD table in the following way:
CREATE OR REPLACE TRIGGER mark_change_monitoring
BEFORE UPDATE OF MARK ON RECORD
FOR EACH ROW
BEGIN
IF ((:NEW.MARK/:OLD.MARK) >= 1.1) OR ((:OLD.MARK/:NEW.MARK) >= 1.1)
THEN
RAISE_APPLICATION_ERROR(-20002, 'Warning: Large percentage change in marks prohibited.');
END IF;
END;
The above two examples should have shown you what triggers are capable of doing. In fact, using Oracle’s PL/SQL language, one can write much more complex triggers to enforce various business rules. The discussion of PL/SQL is beyond the scope of this module. Interested students are again advised to refer to any book specifically dealing with Oracle PL/SQL programming for more information on writing triggers.
Review question 7
When and how do we use triggers to maintain referential integrity?
How do we use triggers to implement business rules in the database?
Activity 7 - Creating triggers to prevent updates and deletions
In the university database, we can see that the rows in the DEPT table are often referenced by many child rows in a number of other tables (e.g. STUDENT, LECTURER and MODULE). Although there are FOREIGN KEY constraints declared on the child tables to maintain the referential integrity, we can still define a trigger in the parent table (i.e. DEPT) to stop any attempt to change the name of the department and/or to remove any of the DEPT rows. This is corresponding to the business rule stating that once a university department is established, it will be there ‘forever’ and will not be allowed to change name (we assume that such a rule is necessary).
In this activity, write appropriate PL/SQL statements to create the trigger. After the trigger is created, try to change the name of some departments in DEPT and delete a row from DEPT, and see what happens. Find out how the trigger works.
Note that in order to execute PL/SQL statements in some DBMSs (including Oracle’s SQL*PLUS), you may need to end the block of statements with a ‘/’. Consult your DBMS’s documentation for any additional semantics requirements.
Activity 8 - Creating triggers to maintain data validity
In Activity 5, we have declared a CHECK constraint on MARK in the RECORD table. Any mark that is not between 0 and 100 will cause a violation of the constraint. Applying the CHECK constraint, however, we would not know whether the mark is greater than 100 or smaller than 0 (i.e. a negative number).
In this activity, we will create a trigger to replace the original CHECK constraint, which can tell us how the restriction on MARK is violated. Whenever the value of MARK is beyond the valid range (0 – 100), the trigger will generate an error message informing users whether it is greater than 100 or a negative number.
Write proper PL/SQL statements to create the trigger, and use some SQL UPDATE and INSERT statements to test it. Remember we need to drop the CHECK constraint first, otherwise it will override any other triggers on MARK.
Activity 9 - Creating triggers to validate new column values
In the STUDENT table, the column SLEVEL can only take value 0, 1, 2, 3 or NULL. Any other value is illegal. In order to ensure that only valid values are stored in SLEVEL, we can create a trigger to automatically validate any new value to be updated or inserted. The rules are:
If a new value is smaller than 0, then set it to 0 before updating or inserting it.
An appropriate message is always displayed on the screen to inform the user that a proper validation has been carried out.
Write proper PL/SQL statements to create the trigger, and use some SQL UPDATE and INSERT statements to test it.
Note that the Oracle’s DBMS_OUTPUT.PUT_LINE procedure can be used to display text on screen. The basic syntax is:
DBMS_OUTPUT.PUT_LINE (‘the text to be displayed in single quotes’);
Remember that for Oracle, in order to use DBMS_OUTPUT.PUT_LINE to display text on screen, you need to execute the command "SET SERVEROUTPUT ON" once in the SQL*PLUS environment.
The rest of this chapter deals with some additional features that are present in Oracle. In other advanced DBMSs, similar features are also available. Again, please consult your DBMS’s documentation to find out whether or not it supports the following features.
Some sophisticated business rules and application logic can be implemented and stored as procedures within Oracle. In fact, triggers are special types of procedures associated with tables and invoked (called upon) by pre-specified events.
Stored procedures, containing SQL or PL/SQL statements, allow one to move code that enforces business rules from the application to the database. As a result, the code can be stored once for use by different applications. Also, the use of stored procedures can make one’s application code more consistent and easier to maintain. This principle is similar to the good practice in general programming in which common functionality should be coded separately as procedures or functions.
Some of the most important advantages of using stored procedures are summarised as follows:
Because the processing of complex business rules can be performed within the database, significant performance improvement can be obtained in a networked client-server environment (refer to client-server chapters for more information).
Since the procedural code is stored within the database and is fairly static, applications may benefit from the reuse of the same queries within the database. For example, the second time a procedure is executed, the DBMS may be able to take advantage of the parsing that was previously performed, improving the performance of the procedure’s execution.
Consolidating business rules within the database means they no longer need to be written into each application, saving time during application creation and simplifying the maintenance process. In other words, there is no need to reinvent the wheel in individual applications, when the rules are available in the form of procedures.
In Oracle, a procedure is implemented to perform certain operations when called upon by other application programs. Depending on the operations, it may not return any value, or it might return one or more values via corresponding variables when its execution finishes. Unlike procedure, a function always returns a value to the caller as a result of completing its operations. It is also worth mentioning that a function may be invoked by code within a procedure, and a procedure may be called from within a function.
In Oracle, groups of procedures, functions, variables and SQL statements can be organised together into a single unit, called a package. To execute a procedure within a package, one must first specify the package name, followed by the procedure name, as shown in the following example:
DBMS_OUTPUT.PUT_LINE(‘This is an example to show how to use a procedure within a package.’);
In the example, DBMS_OUTPUT is the package containing a number of procedures relating to displaying message on the screen. PUT_LINE is a procedure within the DBMS_OUTPUT package that can take a string of characters (i.e. the text in the single quotes) and output them onto the screen.
Note that in order to use Oracle’s DBMS_OUTPUT.PUT_LINE procedure to display text on screen, you need to execute the command SET SERVEROUTPUT ON once in the SQL*PLUS environment.
We use the following example to illustrate how to create a procedure:
CREATE PROCEDURE check_student_mark (id_number IN INTEGER, module_code IN VARCHAR2, the_mark OUT INTEGER)
AS
BEGIN
SELECT MARK INTO the_mark
FROM RECORD
WHERE SID = id_number AND CODE = module_code;
END;
It can be seen from the example, that the syntax for creating procedures is somewhat similar to that of creating triggers, except that we need to specify the input and/or output variables to be used in the procedure.
The CREATE PROCEDURE clause defines the procedure’s name (e.g. "check_student_mark") as well as variables. The keyword IN defines an input variable together with its data type (e.g. id_number IN INTEGER), and OUT defines an output variable together with its data type(e.g. the_mark OUT INTEGER). The query result is returned via the output variable "the_mark".
After the keyword AS, the BEGIN/END block contains PL/SQL code to implement the required operations. It can be as simple as containing a single SQL statement, as in our example. It can also be as complex as necessary.
The created procedure can then be used to retrieve the mark for a particular student on a specific module. For example,
check_student_mark(12345, ‘BIS42’, the_mark)
will retrieve the mark for the student with identity number of 12345 on module BIS42. The query result is stored in the variable "the_mark".
The CREATE PROCEDURE clause is used for creating a new procedure. To replace an existing one, we can use CREATE OR REPLACE PROCEDURE.
Again we use an example to illustrate how to create a function:
CREATE FUNCTION retrieve_my_mark (id_num IN INTEGER, mod_code IN VARCHAR2)
RETURN INTEGER
IS
my_mark INTEGER;
BEGIN
SELECT MARK INTO my_mark
FROM RECORD
WHERE SID = id_num AND CODE = mod_code; RETURN (my_mark);
END;
It can be seen from the example, that the syntax for creating functions is similar to that of creating procedures. However, there are a couple of important differences.
The CREATE FUNCTION clause defines the function’s name (e.g. "retrieve_my_mark") as well as input variables. The keyword IN defines an input variable together with its data type (e.g. id_num IN INTEGER).
The RETURN keyword specifies the data type of the function’s return value, which can be any valid PL/SQL data type (e.g. RETURN INTEGER). Every function must have a RETURN clause, because the function must, by definition, return a value to the calling environment.
In the BEGIN/END block, the RETURN(my_mark) command performs the necessary action to return the required value to the calling environment.
The created function can then be used to retrieve the mark for a particular student on a specific module. For example,
my_mark := retrieve_my_mark(12345, ‘CSC4001’)
will retrieve the mark for the student with identity number of 12345 on module CSC4001. The query result is returned and held in the variable "my_mark".
The CREATE FUNCTION clause is used for creating a new function. To replace an existing one, we can use CREATE OR REPLACE FUNCTION.
If the check_student_mark procedure has already been created, then it can be used by function retrieve_my_mark. In this case, the function is redefined as following:
CREATE OR REPLACE FUNCTION retrieve_my_mark (id_num IN INTEGER, mod_code IN VARCHAR2)
RETURN INTEGER
IS
my_mark INTEGER;
BEGIN
check_student_mark(id_num, mod_code, my_mark); RETURN (my_mark);
END;
It can be seen from the above example, that instead of rewriting an SQL retrieval statement, the procedure check_student_mark is used to retrieve the mark and store the result in the variable my_mark. And then the value held in my_mark is returned as the value of the function.
Similarly, if the function is created first, then it may be invoked from within the procedure.
Review question 8
Why are stored procedures useful in databases?
Having studied this chapter, we should have obtained a fair amount of knowledge about declarative constraints, database triggers and stored procedures. We have seen in Oracle that PL/SQL is a very useful as well as powerful language for creating triggers to enforce business rules.
Now use any database application with which you may be familiar (e.g. for a bank, a car-rental company, etc) to discuss in general what kind of application logic and/or business rules should be implemented in the database using constraints and triggers. The objective of this discussion is to help you understand further the usefulness and benefits of the techniques.
In this chapter, we have studied the five declarative constraints and the mechanisms for creating database triggers and procedures in more advanced DBMSs such as Oracle. We have seen that the constraints, database triggers and procedures can be effectively used to incorporate application logic and enforce business rules in databases.
A number of examples have been provided in this chapter. As additional activities, you may wish to try out those examples, using the university database that has been created during previous activities.
We have also seen in this chapter that the PL/SQL language of Oracle plays a very important role in creating database triggers and procedures. In fact, PL/SQL is a powerful language in Oracle that enables us to construct flexible triggers and procedures to deal with various complex application issues. Although we were not able to cover PL/SQL to a sufficient extent, interested students who want to develop further knowledge on PL/SQL are advised to read relevant books.